I Used JavaScript To Make Motion Graphics For A Video
AKA: Building with the tools you have, not the tools you think you need.


Introduction
I've been thinking a lot lately about how deadlines, budgets, and resource constraints help drive innovation and creativity.
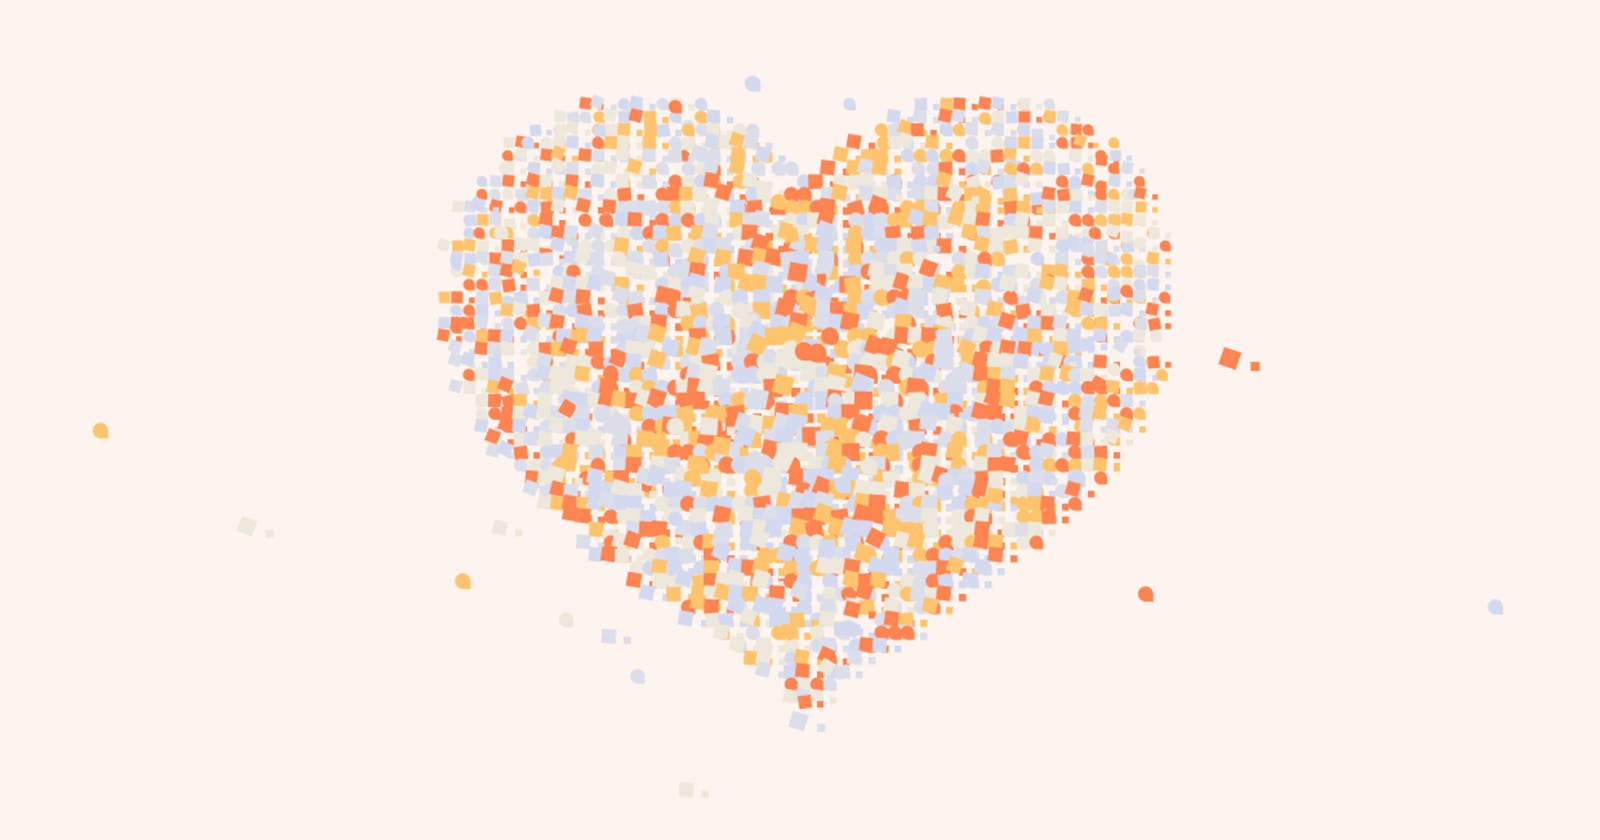
I work in Developer Relations at Bundlr, and we recently launched new branding. If you're into reading about stuff like that, you can geek out on this blog post, but the gist is we're using particles to imagine how "disparate chunks of data come together to form Bundlr, a cohesive layer of data". The particles are used to visually show the evolution of storage from on-premises servers, to the cloud, to the decentralized layer of data that is Bundlr. The particles on our website are really pretty, they're organic forms embued with exciting energy.
Before launching our new branding, we had the idea to post a video teaser, an announcement about the announcement. The video would post on Valentine's Day, and we came up with this idea of a sea of particles floating around, then coming together to form a heart, breaking apart to make room for some text, and then coming back together again to form our logo.
I have a lot of experience editing video with Adobe Premiere, but my experience working with After Effects is limited to doing 2D motion graphics stuff. I did some YouTube research on creating particle systems, and most of the examples used plugins I didn't have. I knew freelancers that could do the job easily, but this was a smaller project that didn't have a budget allocation behind it.
But ... then I remembered the tutorials I'd watched on one of my favorite YouTube channels, Frank's Laboratory, on particle animations in JavaScript, which got me thinking about another way to go about this.
The Video
You probably want to see the finished video first, right?
The Solution
Frank's Laboratory is an amazing YouTube channel that mostly focuses on creating games and cool animations with Vanilla JavaScript. They're so well done and such a joy to watch that I've taken to watching his tutorials while doing cardio at the gym. By watching them while on the elliptical trainer, I get to just focus on studying what's possible with JavaScript. Also by watching tutorials for entertainment, I get to study education and production techniques ... what works and what doesn't when teaching coding.
Watching tutorials for fun and entertainment has the additional benefit of helping build up your internal references for what's possible. For our particle animation project, I knew I didn't have the experience to create it using After Effects ... but I remembered this video on Frank's channel where he animated particles in the shape of text, and another one where he animated particles moving around and finally another one with this particle rain effect. I figured I could take everything I learned from his channel and combine bits and pieces together to create the animation I wanted. Then I could use screen capture tools to record the animation, throw it into Premiere, add some titles and finish it off.
Shouldn't be too hard, right?
Let's Code
Ok, as always, here's the full code repository in case you want to open it up in a separate tab as you read along. If you want to see the code in action, I've got it running here.
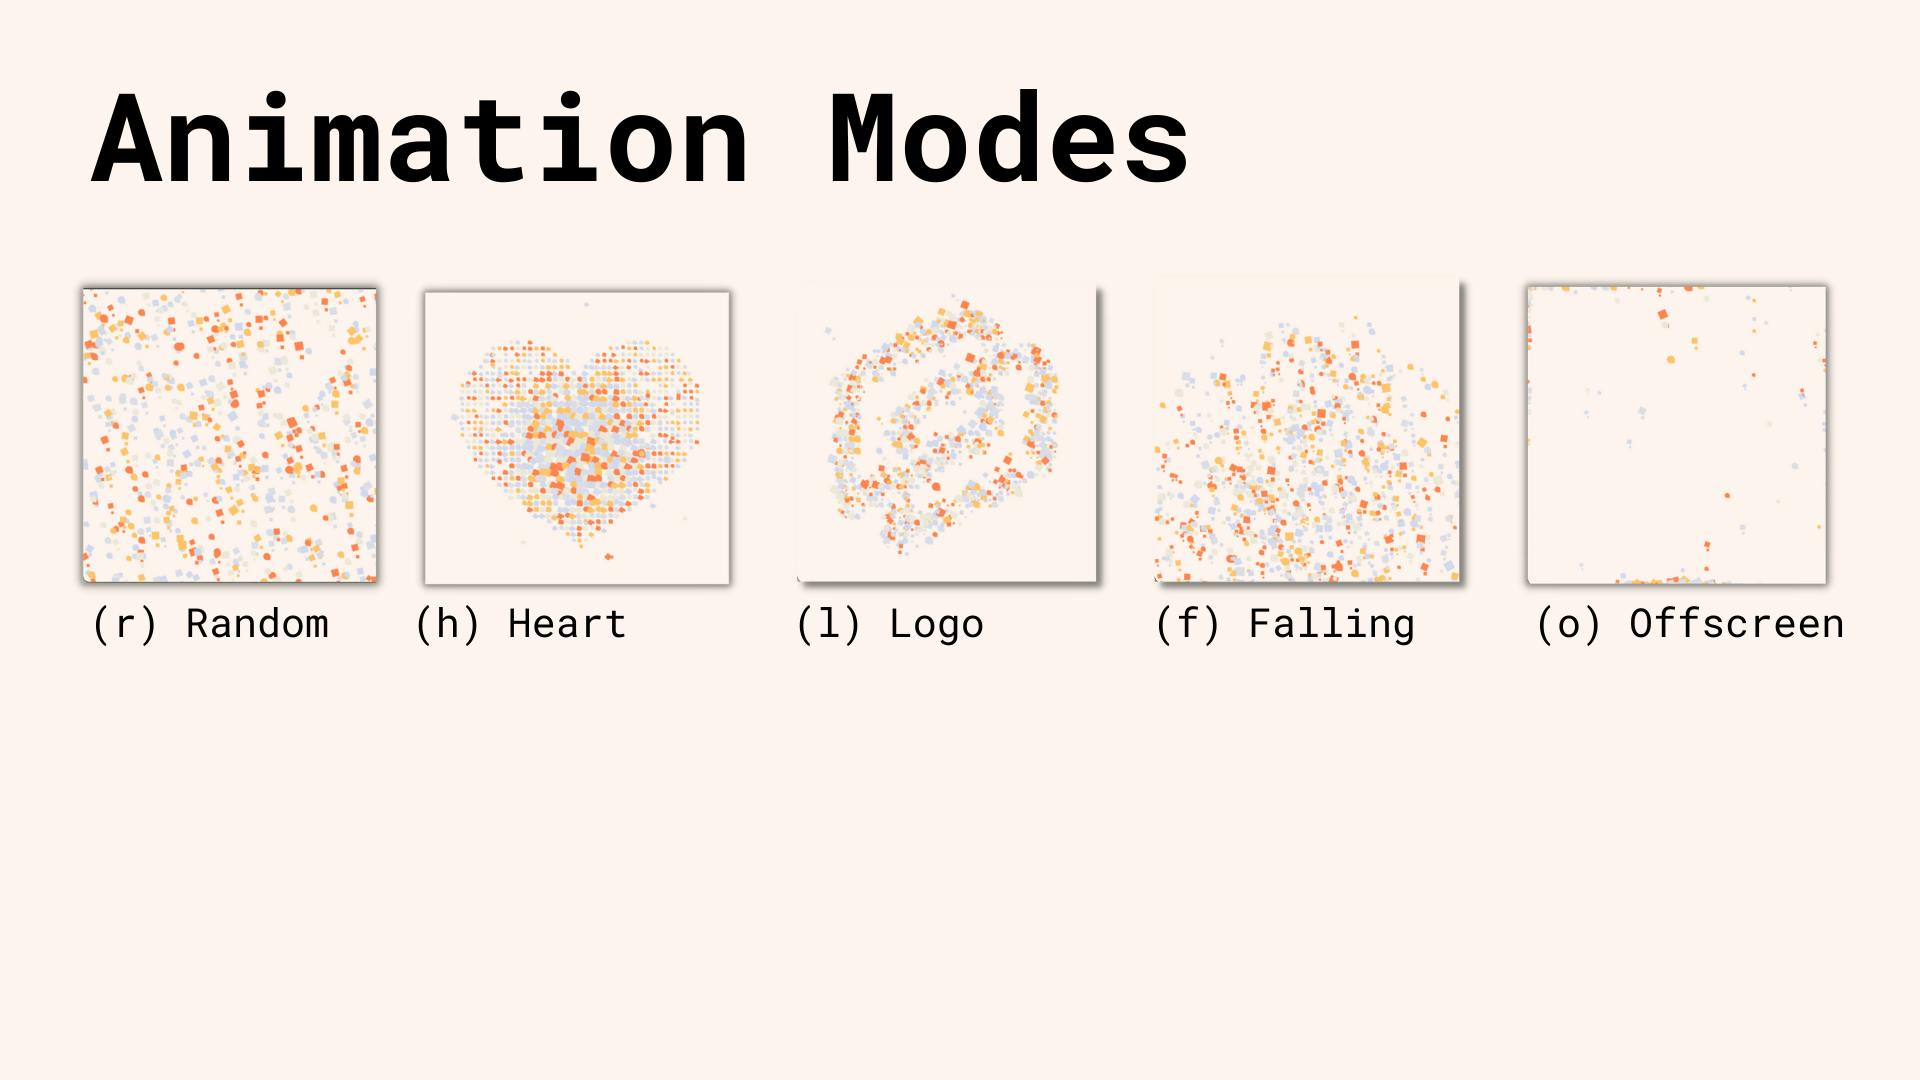
To change the animation modes click:
- (r) random - (h) heart - (l) logo - (f) falling rain - (o) offscreen
Architecture
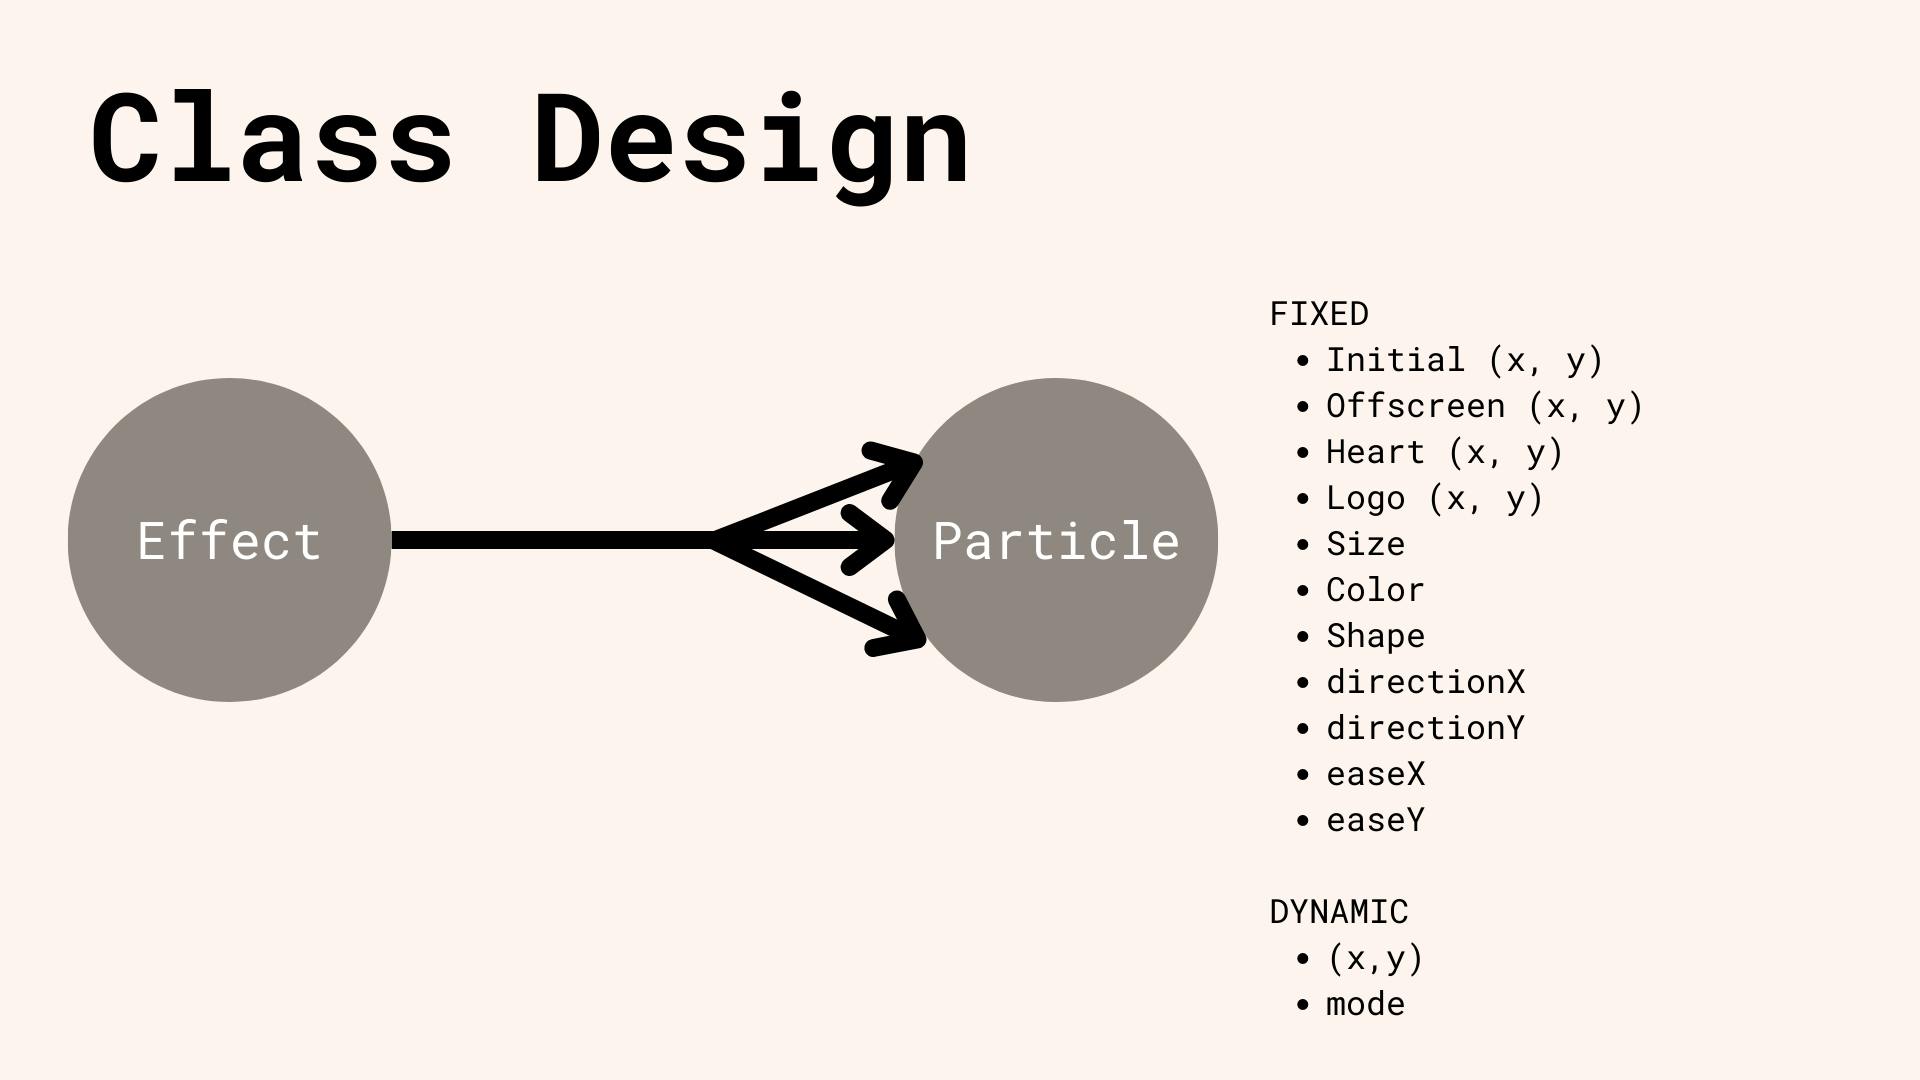
Expanding on Frank's code design, I used an architecture where a single "Effect" object would hold an array of "Particle" objects. Each particle would have a collection of state variables, some would be fixed and unique to that particle, and some would be dynamic.
Animations
Particle movement would be governed by an animation mode variable. We'd use the keyboard to set the mode, and then in my animation loop, I would make different decisions based on the active mode.
Framework
Let's start coding. Here are my index.html and styles.css files.
<!DOCTYPE html>
<html lang="en">
    <head>
        <meta charset="UTF-8" />
        <meta http-equiv="X-UA-Compatible" content="IE=edge" />
        <meta name="viewport" content="width=device-width, initial-scale=1.0" />
        <title>Particle Animation</title>
        <link rel="stylesheet" href="styles.css" />
    </head>
    <body>
        <canvas id="canvas2"></canvas>

        <img id="logo" src="./assets/logo.png" width="600" height="600" />
        <img id="heart" src="./assets/heart.png" width="600" height="600" />

        <script src="script.js"></script>
    </body>
</html>
* {
    margin: 0;
    padding: 0;
    box-sizing: border-box;
}

#canvas1 {
    position: absolute;
    top: 0;
    left: 0;
    border: black;
    border-style: solid;
    border-width: 5px;
}

#canvas2 {
    position: absolute;
}

img {
    display: none;
}
index.html defines an HTML canvas element we'll use to draw on, additionally, there are two images that will be used as masks when positioning our particles. The styles.css file gives some basic styling and then hides the images. By hiding the images we can use them to create masks without actually showing them onscreen (more on this later).
HTML canvas is a powerful feature of the HTML5 standard that allows developers to draw graphics, animations, and other visual content on a web page using JavaScript.
The HTML canvas element provides a rectangular region on a web page where you can draw graphics using JavaScript. You can use it to create a wide range of visual effects, including charts, diagrams, animations, and games.
To use the canvas, you first create a canvas element in your HTML document, and then use JavaScript to access the canvas object's context which you draw directly on.
Finally, here's the beginning of the script.js file. This version of the file contains our class definitions and state variables, but it's still missing most of the logic that deals with the creation and movement of particles. We'll get to that soon.
All of the code is embedded in a load event listener, this ensures my images are loaded before the JavaScript is called.
// wrap in an event listener to make sure the images are fully loaded before the code executes
window.addEventListener("load", function () {
    const canvas = document.getElementById("canvas2");
    const ctx = canvas.getContext("2d");
    canvas.width = window.innerWidth;
    canvas.height = window.innerHeight;

    // this value will be changed by keyboard interactions
    let mode = "random"; // random, heart, logo, falling, offscreen

    // main particle class, we will be creating LOTS of these
    class Particle {
        constructor(x, y, size, effect) {
            this.x = Math.random() * canvas.width;
            this.y = Math.random() * canvas.height;
            this.effect = effect;
            // our initial position is the heart shape
            this.heartX = Math.floor(x);
            this.heartY = Math.floor(y);

            // set initial position the same, but it will be changed later
            this.logoX = this.heartX;
            this.logoY = this.heartY;

            // pick an offscreen coordinate
            const offscreenDirection = randomInt(1, 4); //1 top, 2 right, 3 bottom, 4 left
            this.offscreenX = 0;
            this.offscreenY = 0;
            if (offscreenDirection === 1) {
                this.offscreenX = this.heartX;
                this.offscreenY = -10;
            } else if (offscreenDirection === 2) {
                this.offscreenX = canvas.width + 10;
                this.offscreenY = this.heartY;
            } else if (offscreenDirection === 3) {
                this.offscreenX = this.heartX;
                this.offscreenY = canvas.height + 10;
            } else if (offscreenDirection === 2) {
                this.offscreenX = -10;
                this.offscreenY = this.heartY;
            }

            this.size = size;

            // pick a random color from our palette
            this.colors = ["#FF8451", "#FFC46C", "#EDE8DB", "#D3D9EF", "#DBDEE9"];
            this.color = this.colors[randomInt(0, this.colors.length - 1)];

            this.easeX = Math.random() * 0.1;
            this.easeY = Math.random() * 0.1;

            // random number for normal movement, makes each particle move at a different speed
            this.directionX = Math.random() / 2;
            this.directionY = Math.random() / 2;

            // half of the time go negative
            if (Math.random() > 0.5) this.directionX = -this.directionX;
            if (Math.random() > 0.5) this.directionY = -this.directionY;

            // should we be a circle or a square
            const shapeDecider = Math.random();
            if (shapeDecider > 0.5) this.shape = "CIRCLE";
            else this.shape = "SQUARE";

            // squares get rotated, don't bother doing it to a circle as nobody would notice :)
            this.degree = 0;
        }
        update() {
            // UPDATE particle location based on active mode
        }

        draw(ctx) {
            // DRAW the particle using HTML Canvas
        }

        setLogoXY(x, y) {
            this.logoX = x;
            this.logoY = y;
        }
    }

    class Effect {
        constructor(width, height, ctx) {
            this.heartImage = document.getElementById("heart");
            this.logoImage = document.getElementById("logo");
            console.log(this.logoImage);
            this.width = width;
            this.height = height;
            this.centerX = this.width / 2;
            this.centerY = this.height / 2;
            this.x = this.centerX - this.heartImage.width / 2;
            this.y = this.centerY - this.heartImage.height / 2;
            this.ctx = ctx;
            this.particlesArray = [];
            this.gap = 10;
        }

        init() {
            // CREATE Particles
        }

        update() {
            this.particlesArray.forEach((particle) => particle.update());
        }
        draw() {
            this.particlesArray.forEach((particle) => particle.draw(this.ctx));
        }
    }

    const effect = new Effect(canvas.width, canvas.height, ctx);
    effect.init();

    // change modes
    addEventListener("keypress", (event) => {
        console.log(event.key);
        const keyPressed = event.key;
        if (keyPressed === "r") mode = "random";
        else if (keyPressed === "h") mode = "heart";
        else if (keyPressed === "l") mode = "logo";
        else if (keyPressed === "f") mode = "falling";
        else if (keyPressed === "o") mode = "offscreen";
    });

    // this function is called over and over, roughly 60x per second
    function animate() {
        ctx.fillStyle = "#FEF4EE";
        ctx.fillRect(0, 0, canvas.width, canvas.height);
        effect.update();
        effect.draw();
        requestAnimationFrame(animate);
    }
    animate();

    // helper stuff
    function randomInt(lowerBound, upperBound) {
        return Math.floor(Math.random() * (upperBound - lowerBound + 1)) + lowerBound;
    }
});
Particle Locations
Each Particle object has a series of state variables that tell it where to move given the active mode. This means that when it's time to form a heart, the Particle object will know what coordinates to move to. The destination is known, but the starting position is always changing ... thus the animations will feel unique and different each time they run.
Particle modes can roughly be categorized into static and dynamic ones. In heart mode, the particle will move to a static location to form a heart with other particles. Logo mode is the same. For offscreen mode, the particle will have a static location moving it off of one of the four screen edges.
Computing the particle location for heart and logo modes is one of the more interesting things in this project, and it's where we'll start first.
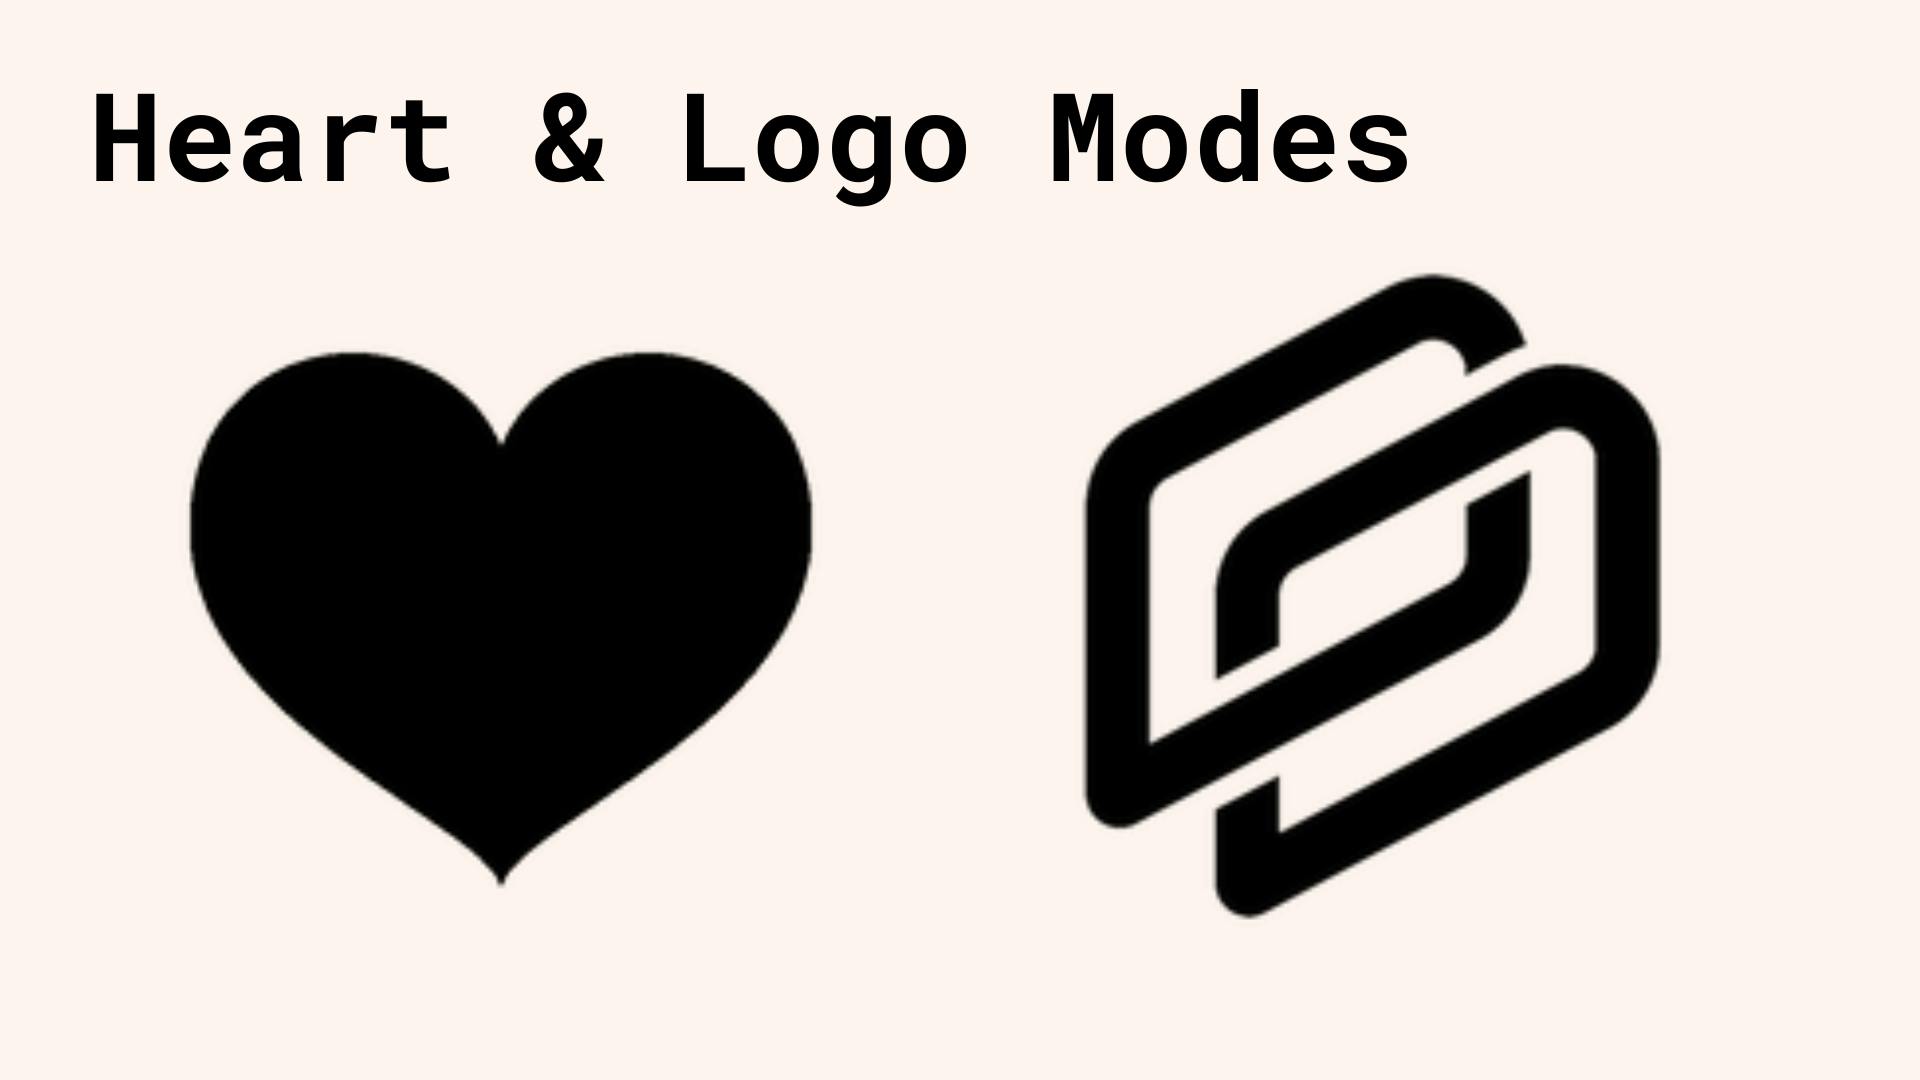
If you look at the heart.png and logo.png files in GitHub you'll notice they are equally sized square black and white images. They are png images with a transparent background setting.
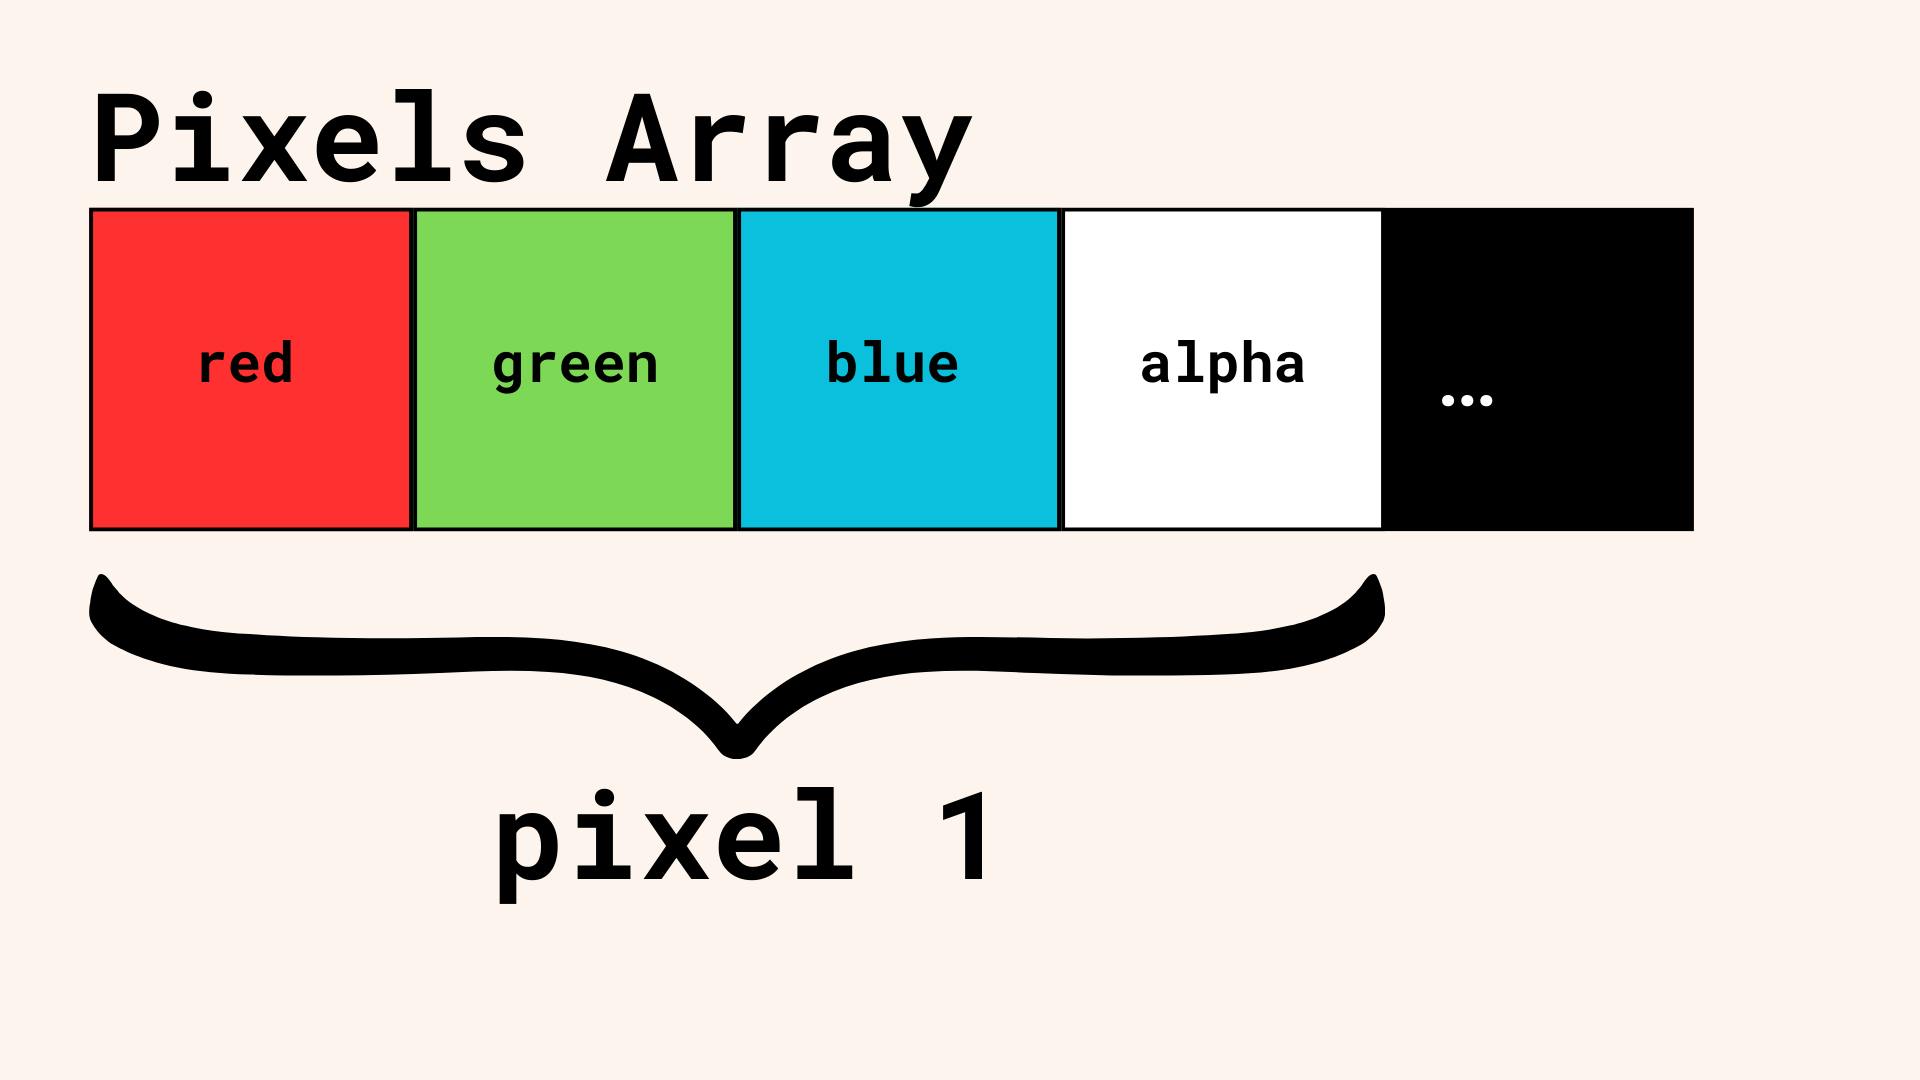
When working with images in JavaScript, they are represented internally by a pixels array. Within this array, a total of 4 array elements are used to define each pixel. Position 1 contains the red value, position 2 contains the green value, position 3 the blue value, and position 4 the alpha (transparency value). This means that if you have an image of 600x600 pixels, you would have a total of 360,000 pixels that needed drawing. Each of these pixels would have 4 array elements in the pixels array for a total of 1,440,000 elements.
Since my image is a black png with a transparent background, every 4th entry in the pixels array (the alpha value) will have a value of 0 when it's a background pixel and 1 when it's an image pixel.
Stay with me here, this a little confusing, but once you grok it, you'll grok it.
To give my particles a position they will use to come together in a heart or logo formation, what I do is:
Get a reference to the source image using
document.getElementById()Resize the source image to match screen size
Get the pixels array associated with the image
Iterate over the pixels array looking at every 4th value (the alpha value)
Ignore alpha values of 0 (background)
For alpha values != 0, use the associated x, y position to create a new
Particleobject tied to that location
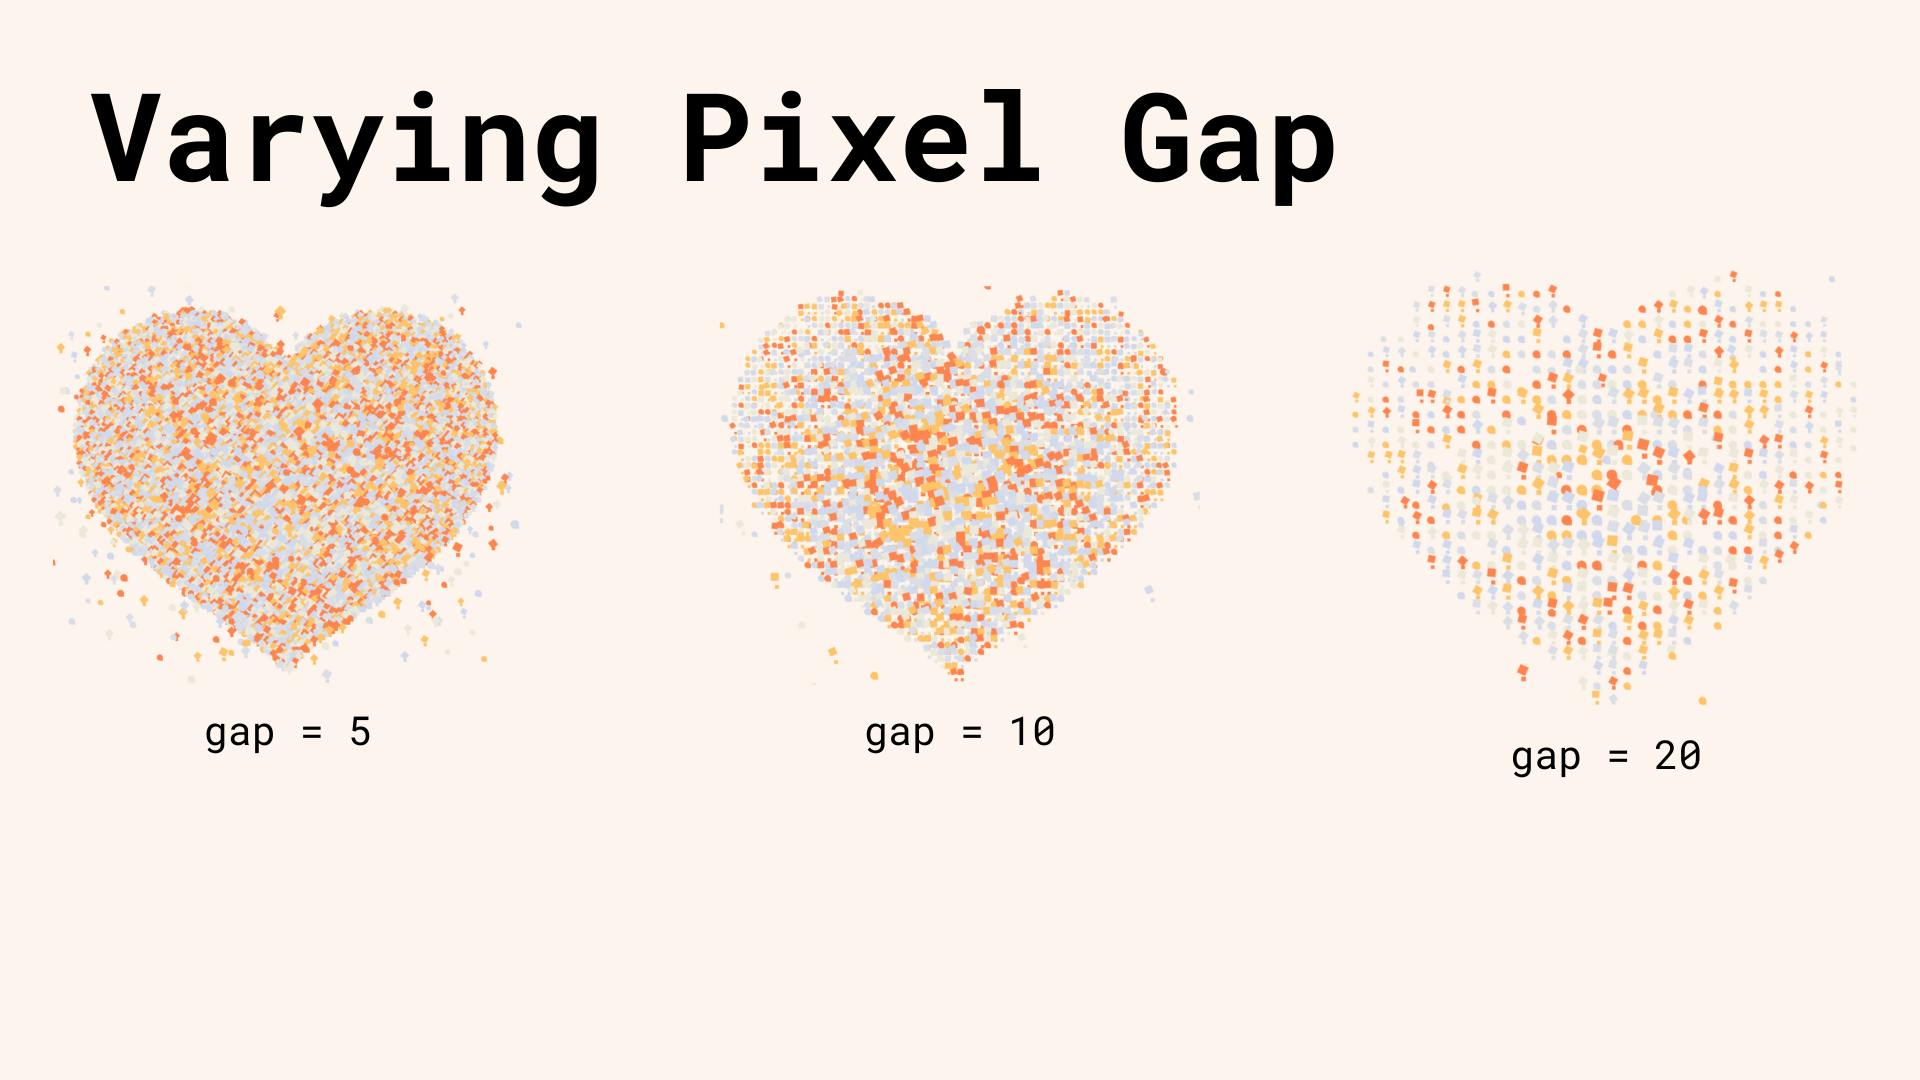
Each x, y coordinate is exactly 1 pixel by 1 pixel. Since my particles will be bigger than that, I jump forward by gap of 10 pixels every time I move through the array. This value is totally arbitrary and will depend greatly on the visual effect you're trying to create. I came up with a gap of 10 through pure experimentation.
The number of Particle objects I create will be a direct function of two things: the number of pixels with an alpha value != 0, and the value of the gap parameter I use when generating them. Smaller gap values means more particles and a clearer picture, but more particles means more processing power used to render. Use too low of a value, and your computer will crawl to a halt. Fewer particles means faster animation, but if they're too spaced out, viewers won't understand what they're coming together to form.
Since I have two images I want my particles to form, I will start with the one with a greater surface area (more black pixels.) This way I'm ensured having enough Particles to cover the bigger image. Then I'll repeat the masking for the smaller image and update my Particle array, giving each a second set of static values.
Here's the final init() function of the Effect class.
        init() {
            // images need to be square, so figure out current size and pick the smaller
            // to make into image dimensions
            let imageWidth = this.width;
            let imageHeight = this.height;
            let imageX = 0;
            let imageY = 0;

            if (this.width > this.height) {
                imageX = (this.width - this.height) / 2;
            } else if (this.height > this.width) {
                imageY = (this.height - this.width) / 2;
            }
            if (imageWidth < imageHeight) imageHeight = imageWidth;
            else if (imageHeight < imageWidth) imageWidth = imageHeight;

            this.ctx.drawImage(this.heartImage, imageX, imageY, imageWidth, imageHeight);
            const heartPixels = this.ctx.getImageData(0, 0, this.width, this.height).data;
            for (let y = 0; y < this.height; y += this.gap) {
                for (let x = 0; x < this.width; x += this.gap) {
                    const index = (y * this.width + x) * 4; // 4 because r, g, b, a have separate array positions

                    const alpha = heartPixels[index + 3];
                    if (alpha > 0) {
                        let size = Math.floor(
                            Math.sqrt(
                                Math.pow(canvas.width / 2 - x, 2) + Math.pow(canvas.height / 2 - y, 2),
                            ),
                        );
                        // bigger towards the center
                        size = canvas.width / 2 - size;
                        // scale it down
                        size /= this.width / 15;
                        if (size <= 3) size = 3;
                        //else size = 5;
                        this.particlesArray.push(new Particle(x, y, size, this));
                    }
                }
            }
            // get the logo pixels (there are fewer logo pixels than heart pixels)
            this.ctx.clearRect(0, 0, this.width, this.height);
            this.ctx.drawImage(this.logoImage, imageX, imageY, imageWidth, imageHeight);
            const logoPixels = this.ctx.getImageData(0, 0, this.width, this.height).data;
            const logoXY = [];
            for (let y = 0; y < this.height; y += this.gap) {
                for (let x = 0; x < this.width; x += this.gap) {
                    const index = (y * this.width + x) * 4; // 4 because r, g, b, a have separate array positions

                    const alpha = logoPixels[index + 3];
                    if (alpha > 0) {
                        logoXY.push({ x, y });
                    }
                }
            }

            // iterate over all pixels and give each a random logo location
            this.particlesArray.forEach((particle) => {
                const logoIndex = randomInt(0, logoXY.length - 1);

                const logoX = logoXY[logoIndex].x;
                const logoY = logoXY[logoIndex].y;

                particle.setLogoXY(logoX, logoY);
            });
        }
When working with HTML Canvas animations, we work with a special function called requestAnimationFrame(), that is called over and over to draw each frame of our animation. Like an old-school flip-book, the function draws and redraws itself so fast that our eyes perceive motion. The function is called roughly 60 times per second, but the exact number does depend on processing power.
function animate() {
    // UPDATE AND RENDER EACH FRAME
    requestAnimationFrame(animate);
}
animate();
In our case, we do two things, we tell the Effect object to update itself, then draw itself. Internally, the Effect object iterates through each Particle object telling it first to update and then draw.
Since each Particle object knows where to move depending on the active mode, and each Particle object has its own internal speed and movement direction, the motion will always feel unique and organic. A particle's destination might be fixed, but it's origin will depend on where it previously moved to.
My final animate() function is as follows. First I clear the background using the color #FEF4EE, then I update and draw the particles.
function animate() {
    ctx.fillStyle = "#FEF4EE";
    ctx.fillRect(0, 0, canvas.width, canvas.height);
    effect.update();
    effect.draw();
    requestAnimationFrame(animate);
}
animate();
There's not much happening in the update() and draw() functions inside the Effect class, they just call update() and draw() on each Particle object.
update() {
    this.particlesArray.forEach((particle) => particle.update());
}
draw() {
    this.particlesArray.forEach((particle) => particle.draw(this.ctx));
}
Animation Modes
Animation modes are changed by listening for keypress events and changing a global variable based on the letter pressed.
addEventListener("keypress", (event) => {
    console.log(event.key);
    const keyPressed = event.key;
    if (keyPressed === "r") mode = "random";
    else if (keyPressed === "h") mode = "heart";
    else if (keyPressed === "l") mode = "logo";
    else if (keyPressed === "f") mode = "falling";
    else if (keyPressed === "o") mode = "offscreen";
});
Particle Update
Within the Particle class, the update function is called before each render. This function is where the particle updates its current position based on the active mode.
update() {
    // check edges, but not for offscreen mode
    if (mode !== "offscreen") {
        if (this.x > canvas.width || this.x < 0) {
            this.directionX = -this.directionX;
        }
        if (this.y > canvas.height || this.y < 0) {
            this.directionY = -this.directionY;
        }
    }

    if (mode === "random") {
        this.x += this.directionX;
        this.y += this.directionY;
    } else if (mode === "heart") {
        this.x += (this.heartX - this.x) * this.easeX;
        this.y += (this.heartY - this.y) * this.easeY;
    } else if (mode === "logo") {
        this.x += (this.logoX - this.x) * this.easeX;
        this.y += (this.logoY - this.y) * this.easeY;
    } else if (mode === "falling") {
        this.y += Math.abs(this.directionY);
    } else if (mode === "offscreen") {
        this.x += (this.offscreenX - this.x) * this.easeX;
        this.y += (this.offscreenY - this.y) * this.easeY;
    }
}
Drawing
Once each Particle object has updated its position based on the current mode, the draw function is called to render the particle to the screen. Circle particles are drawn by passing an x, y location for the center and a radius. For square particles, I also implemented rotation to make movement seem more organic. There's no need to waste processing power rotating the circle particles, as visually a rotated circle looks no different from a non-rotated one.
draw(ctx) {
    if (this.shape === "CIRCLE") {
        ctx.beginPath();
        ctx.arc(this.x, this.y, this.size, 0, Math.PI * 2);
        ctx.fillStyle = this.color;
        ctx.fill();
    } else {
        ctx.save();
        ctx.translate(this.x - this.size, this.y - this.size);
        ctx.rotate((this.degree * Math.PI) / 180); // rotate squares
        this.degree += Math.random();
        ctx.fillStyle = this.color;
        ctx.fillRect(0, 0, this.size * 2, this.size * 2);
        ctx.restore();
    }
    ctx.fillStyle = this.color;
    ctx.fillRect(this.x, this.y, this.size, this.size);
}
Making The Video
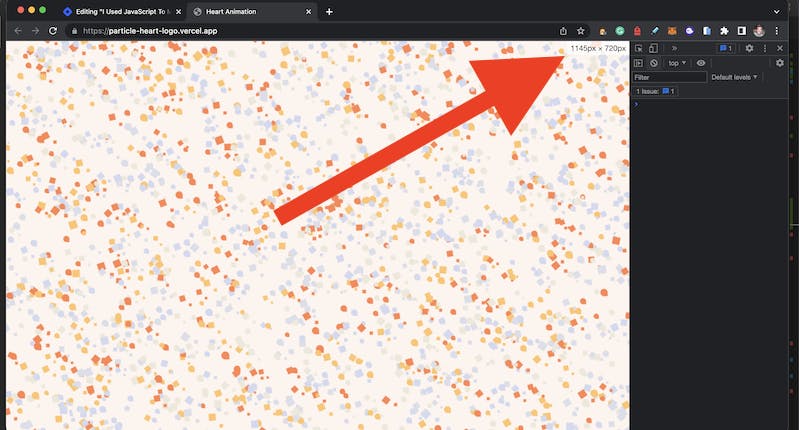
With the code working, the only thing left to do was make the video. Adobe Premiere allows you to edit video of any size, but when uploading video to Twitter it's recommended you use either 1:1 or 16:9 aspect ratio. 1:1 video is your typical square video (popularized by Instagram), and is usually 800x800 pixels or so. The 16:9 aspect ratio is what people are used to seeing on TV, it's generally either 3840x2160 (4K), 1920x1080 (full HD), or 1280x720 (half HD).
I opened up a new Chrome tab with my animation running, then opened the developer console because it shows the size in pixels of the open tab when resizing. By resizing my source window to a 16:9 size, I'm guaranteed there will be no cropping when editing.
Then with the animation running, I used QuickTime to do a screen recording as I controlled the animation using the keyboard. I knew my final animation would be roughly 10-15 seconds, so I kept it to roughly that while creating the screen recording. I could always edit the length down in Adobe Premiere, but by creating better source materials, I save a lot of time in production.
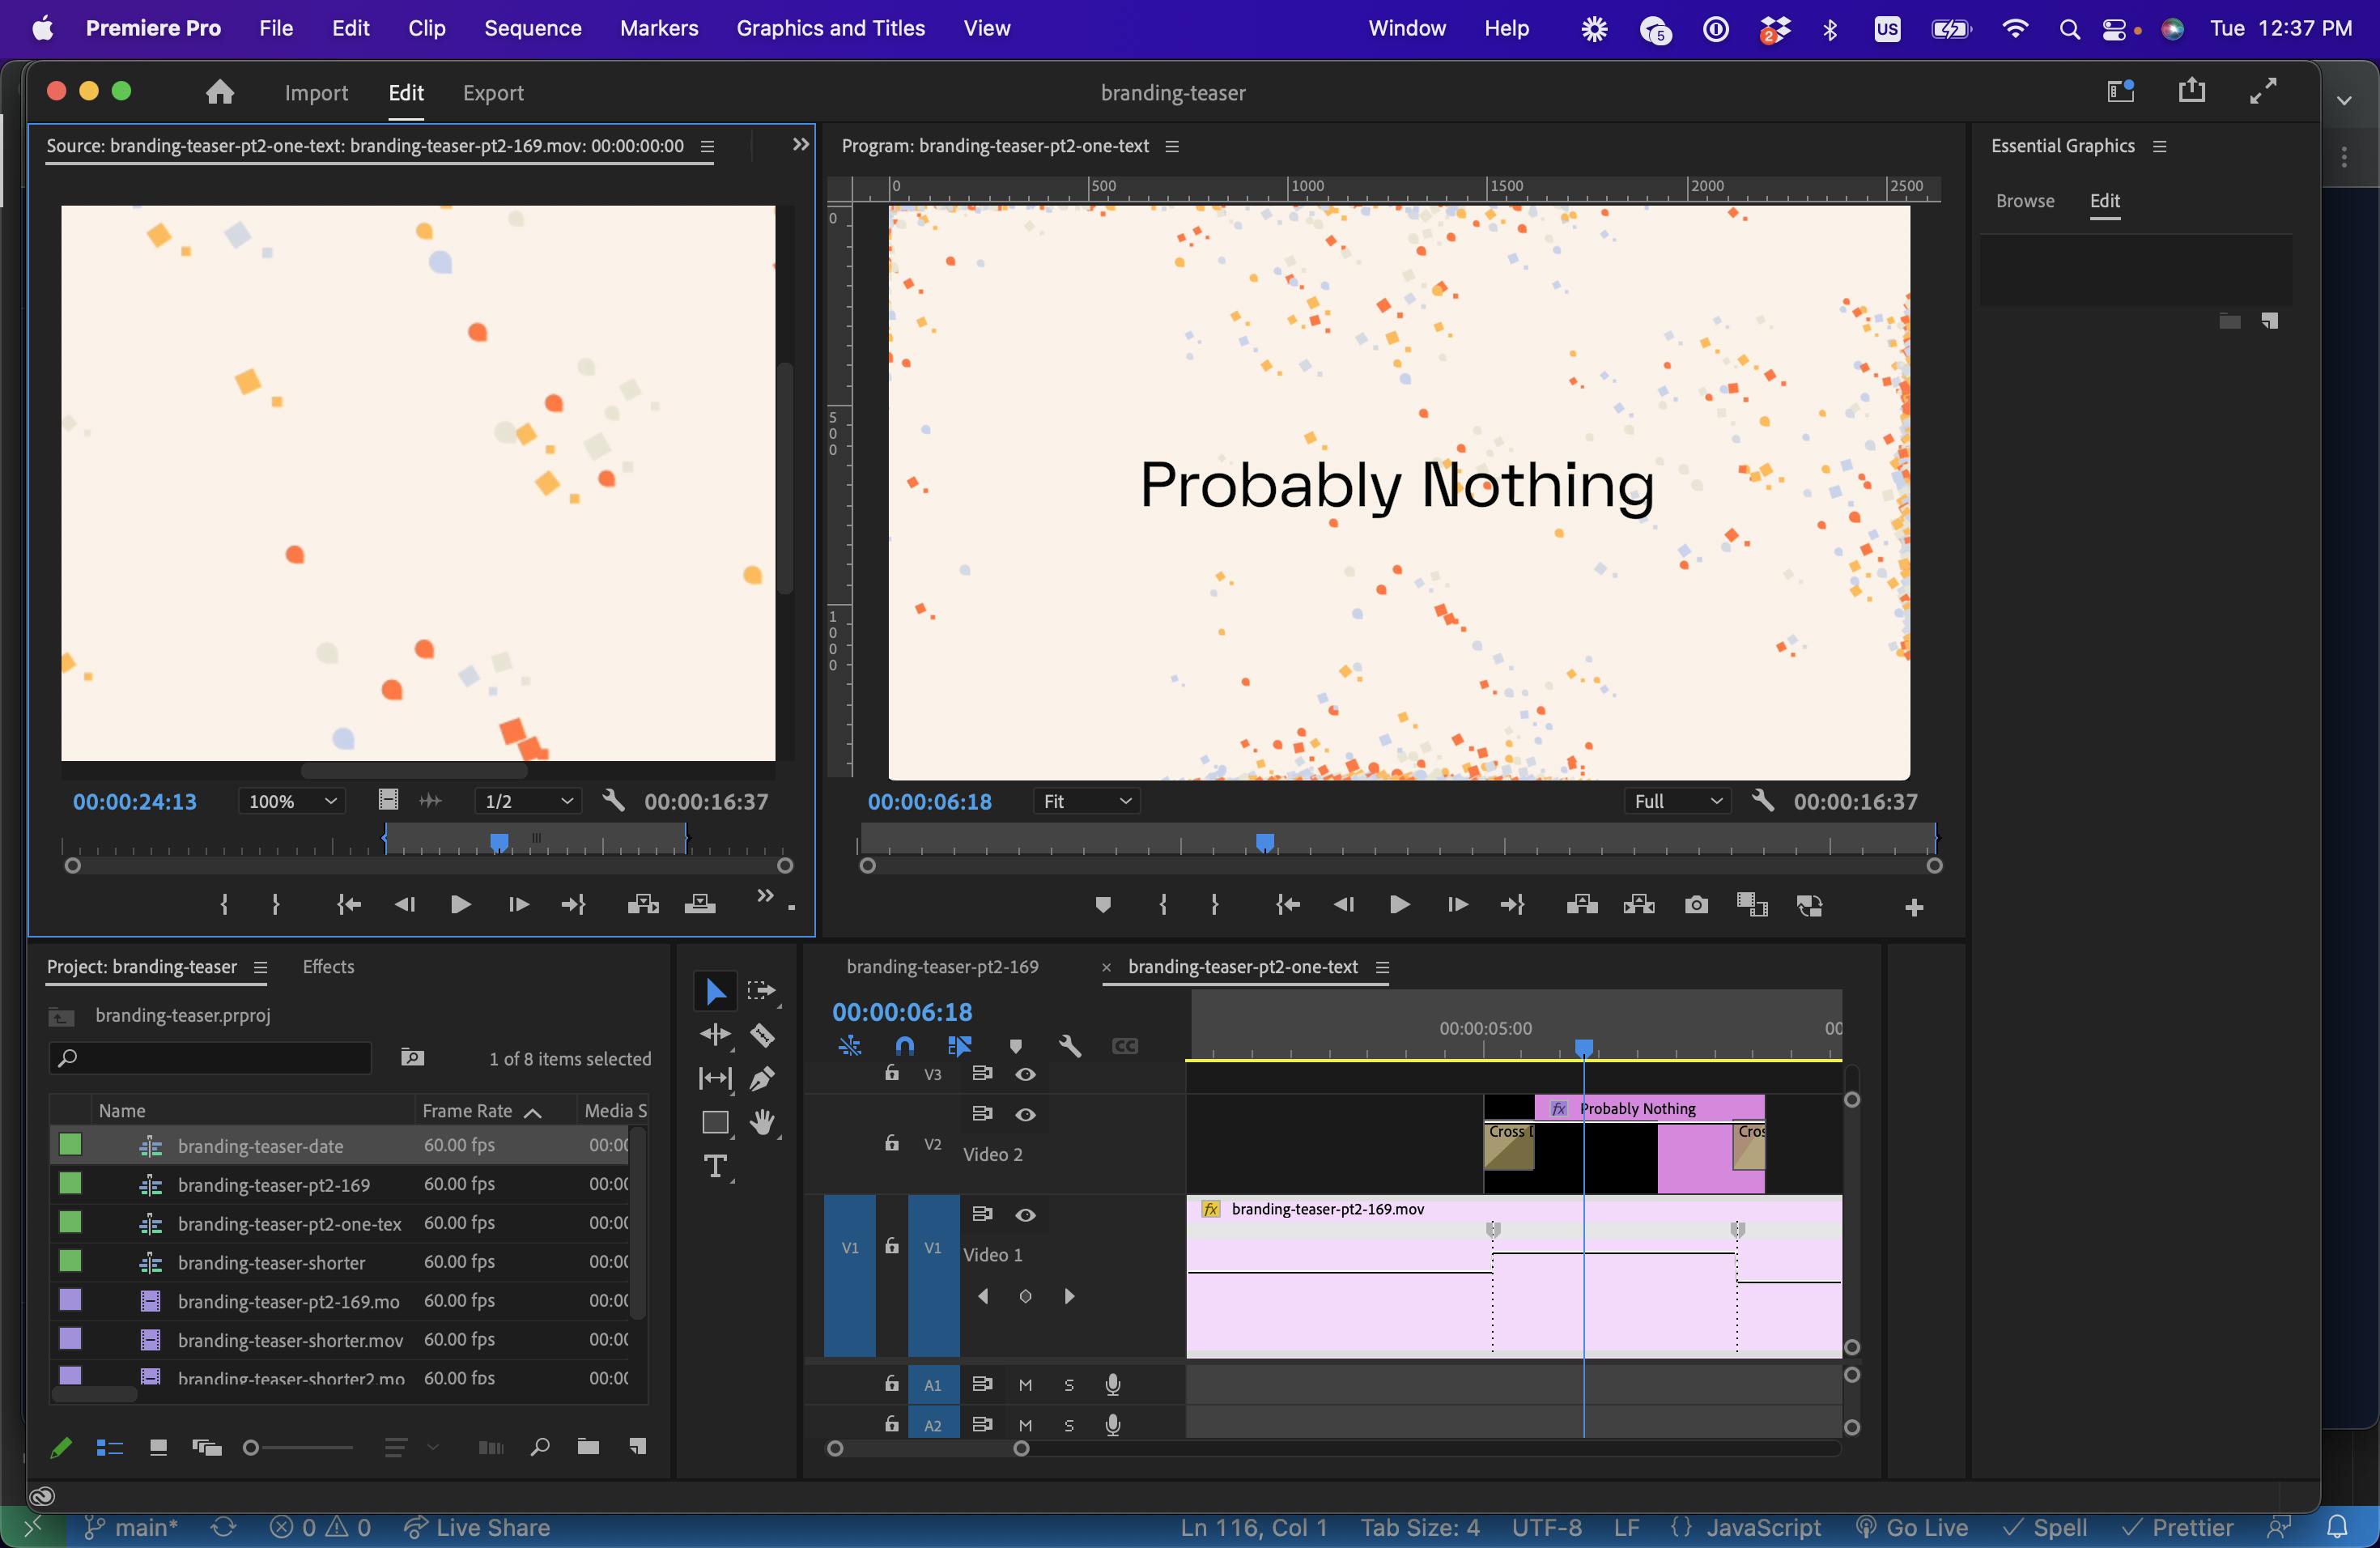
Finally, I created a new project in Premiere, created a new HD sequence, imported my source footage, created some titles, and exported the final video.
What's Next
When starting any job, the skills we bring to the table represent the sum total of everything we've done in life so far. I've had a pretty non-standard career path that started with me working tech in the 90s, moved on to teaching yoga, then doing video and TV production, and finally back to tech again. I'm lucky in that I've got lots of random experiences I can pull from, but my experience is often wider than it is deeper.
My friends who worked in production longer than I did probably have the skills to do the full animation right in After Effects, I don't ... but I had enough coding experience to find another way to solve the problem.
Each of us has a different background with different skills, nobody is going to be a perfect match for every project ... but with creativity, we can all pull from our varied abilities and create a new type of solution. It might not always be exactly what our client (or boss) had in mind, but if it solves the problem that's all that matters.