I Built An HTML Canvas NFT using Bundlr
Just code everything in one big file, upload to Bundlr, add to NFT metadata and mint your NFT.
I've built a few NFT projects, and just because of the nature of the projects I always created SVG NFTs. Unrelated, I've also been getting into creative coding with HTML Canvas. I find it really relaxing to create stuff that looks cool. I never really put in the time to learn to draw with pens and markers, but I feel like with HTML Canvas, I can be visually expressive in a way that I like.
I knew that it was possible to create NFTs using HTML Canvas, but wasn't totally sure how ... and struggled to find a good tutorial online. I found this one which had some good info, but was mostly focused on how to deploy on Tezos. Then I found a breakdown of the NFT Metadata spec, which is how I found the animation_url attribute and this sentence "Animation_url also supports HTML pages, allowing you to build rich experiences and interactive NFTs using JavaScript canvas, WebGL, and more. ".
Then I Googled around some more and found mixed info about bundling resources, using 3rd party libraries and all that.
So ... for this first test, I decided to create an HTML Canvas NFT. I decided to just code everything in one html file I can upload to Bundlr and then use in my NFT metadata. Going to start small, start easy and then do a follow-up tutorial using some 3rd party libraries.
My idea for the project was to generate a tree using recursion. The tree would be made of two colors and it would have leaves of a third color. Then I'll "shake" the tree, make a leaf fall and once it hits the bottom I'll grow a new tree using the leaf color as the base tree color. I'll probably have to have a max number of "trees" so things don't get messy and slow, but we can experiment with that once the code is running.
You can follow along below, or just jump to the code.
If you're not interested in the HTML Canvas animation, you can skip down to the bottom section titled "Blockchain Code" where I deploy to the blockchain.
HTML Canvas Code
In the file index_template.html I define a rough structure for the project.
<!DOCTYPE html>
<html lang="en">
    <head>
        <meta charset="UTF-8" />
        <title>Neon Forest</title>
    </head>
    <body>
        <canvas id="canvas" width="500" height="500"></canvas>
        <script>
            class Leaf {
                constructor(x, y, color) {}

                /**
                 * Draw the leaf at current coordinates.
                 */
                draw() {}
            }

            class Tree {
                constructor() {}

                /**
                 * Randomly pick a leaf and let it fall until it hits the ground,
                 * then tell Earth to plant a new tree at that location.
                 */
                shake() {}

                /**
                 * Draw the tree using stored instructions, followed by leaves.
                 */
                draw() {}

                /**
                 * Recursive function used to define the tree. As this tree is constantly
                 * redrawn in an animation loop, we save processing power by only
                 * computing the design once, then we redraw it from the saved instructions.
                 */
                init(startX, startY, length, angle, depth, branchWidth) {}
            }

            class Earth {
                constructor() {}

                /**
                 * Creates a new tree at x, height
                 */
                plantNewTree(x, leafColor) {}

                /**
                 * Draws our whole "planet", each tree followed by its leaves.
                 */
                draw() {}
            }

            const earth = new Earth();
            const drawAll = () => {
                requestAnimationFrame(drawAll);
            };

            drawAll();
        </script>
    </body>
</html>
I'm using Object Oriented JavaScript and define three main classes
Earth: A collection of trees.Tree: A single visual representation of a tree along with a collection of Leaves.Leaf: A single leaf at the end of a tree branch.
I put all that JavaScript code into a <script> tag-set, and place all that code in a simple index.html file that does little more than define a <canvas> element with a width of 500 and height of 500. It's important to place the JavaScript AFTER the <canvas> tag to allow the canvas to be accessed. Once I finish the code, I'll upload the entire index.html to Bundlr and embed that in my NFT metadata.
I've been going back and forth on using global variables in this project, it's not very OO, but I feel like it makes the code way more readable and saves me having to pass lots of variables around. I'm sure someone will think it makes the code ugly, but one of the cool things about coding is there's more than one way to solve a problem.
I start out declaring global variables for the html canvas, width, height, background color and main foreground colors.
const canvas = document.getElementById("canvas");
const ctx = canvas.getContext("2d");

const bgColor = "#FFF338";
const colors = ["#0CECDD", "#FF67E7", "#C400FF"];
const width = canvas.width;
const height = canvas.height;
Earth Class
Starting at the bottom, here's the Earth class:
class Earth {
    constructor() {
        this.trees = [];
        this.maxTrees = 9;
        this.trees.push(
            new Tree(
                width / 2,
                height,
                60,
                -Math.PI / 2,
                12,
                15,
                colors[0],
                colors[1],
                colors[2],
                this,
            ),
        );
    }

    /**
     * Creates a new tree at x, height
     */
    plantNewTree(x, leafColor) {
        // filter array so we only have 2 colors different from leaf color
        const newColors = colors.filter((color) => color != leafColor);

        // make adjustments in case the leaf fell off-screen
        if (x <= 0) x = 10;
        if (x >= width) x = width - 10;

        // add a new Tree object to our array
        this.trees.push(
            new Tree(
                x,
                500,
                60,
                -Math.PI / 2,
                12,
                15,
                leafColor,
                newColors[0],
                newColors[1],
                this,
            ),
        );

        // if the array has reached max capacity, delete the oldest tree
        // Using a FIFO style list allows the forest to slowly grow.
        // Right now I'm just removing it from the screen, thinking I might
        // want to animate its disappearance, but let's keep it simple for the tutorial.
        if (this.trees.length >= this.maxTrees) this.trees.shift();
    }

    /**
     * Draws our whole "planet", each tree followed by its leaves.
     */
    draw() {
        for (let i = 0; i < this.trees.length; i++) {
            // draw the tree
            this.trees[i].draw();
            // shake the tree.
            // while we do call shake() over and over, each tree will only drop exactly one leaf.
            this.trees[i].shake();
        }
    }
}
When creating a new Earth object, the code in the constructor is run once and only once. In OOP it's where you put all your setup code, create variables the other functions will need and do any other setup needed. In the constrictor, I create an array of trees this.trees = [], define a maximum number of trees to be added to the array and finally create one new Tree and throw it in the array.
If you're new to OO JavaScript, you may not have seen much use of the this keyword. It's used to set variable scope to the entire object, meaning any other function within the Earth class can access that value. Had I left it off and only written trees = [], that variable would only be accessible in the constructor. Once the constructor completed execution, it would be marked as available for garbage collection.
For now, just ignore the variables passed to Tree, I'll get to that in a second.
The second function of interest is draw() this will be called over and over by the JavaScript animation loop, generally it's called 60 times per second, but that is a bit browser specific. In draw() I loop over my array of trees, tell it to draw itself and then shake it. Shaking the tree causes a leaf to slowly fall to the floor.
Finally the plantNewTree(x, leafColor) function. plantNewTree is called by a Tree when one of its Leafs has hit the ground. Tree calls back to Earth telling it to grow a new Tree at x, height of the specified leafColor.
Within plantNewTree the logic is pretty basic.
- Look at our master array of three foreground colors and filter it down so it doesn't contain the leaf color. 2. Check the x position of the fallen
Leafand adjust it if it's off-screen. - Create a new
Treeobject, add to our array (remember to prefix the variable name withthis.). - Check if the array of trees is longer than the max length, delete the first one added if so.
Tree Class
The biggest class in the project is the Tree class, a visual representation of exactly one tree. When I was thinking of how to code the tree, I remembered wayyyyy back to when I was studying CS at uni (in the 90s) and a project we did on recursion.
Recursion is used in computer science to break down a problem into smaller chunks, solve those chunks and then combine everything together. A single function is written, and that function calls itself over and over using smaller pieces of data. To prevent an infinite loop, an exit condition is always defined that stops the function from calling itself again. If you forget to code the exit condition, your code will just run forever ... or at least until it eats up every last bit of available RAM and slows your computer wayyyyy down.
To create a tree using recursion we
- Draw a line of a pre-determined length (our "trunk").
- From the tip of our trunk create a set of "sub-branches" at a random angle and of a length less than our current length.
- Repeat above on each sub-branch.
- Stop when branch length is too short.
Confused? Try looking at this simplified graphic.
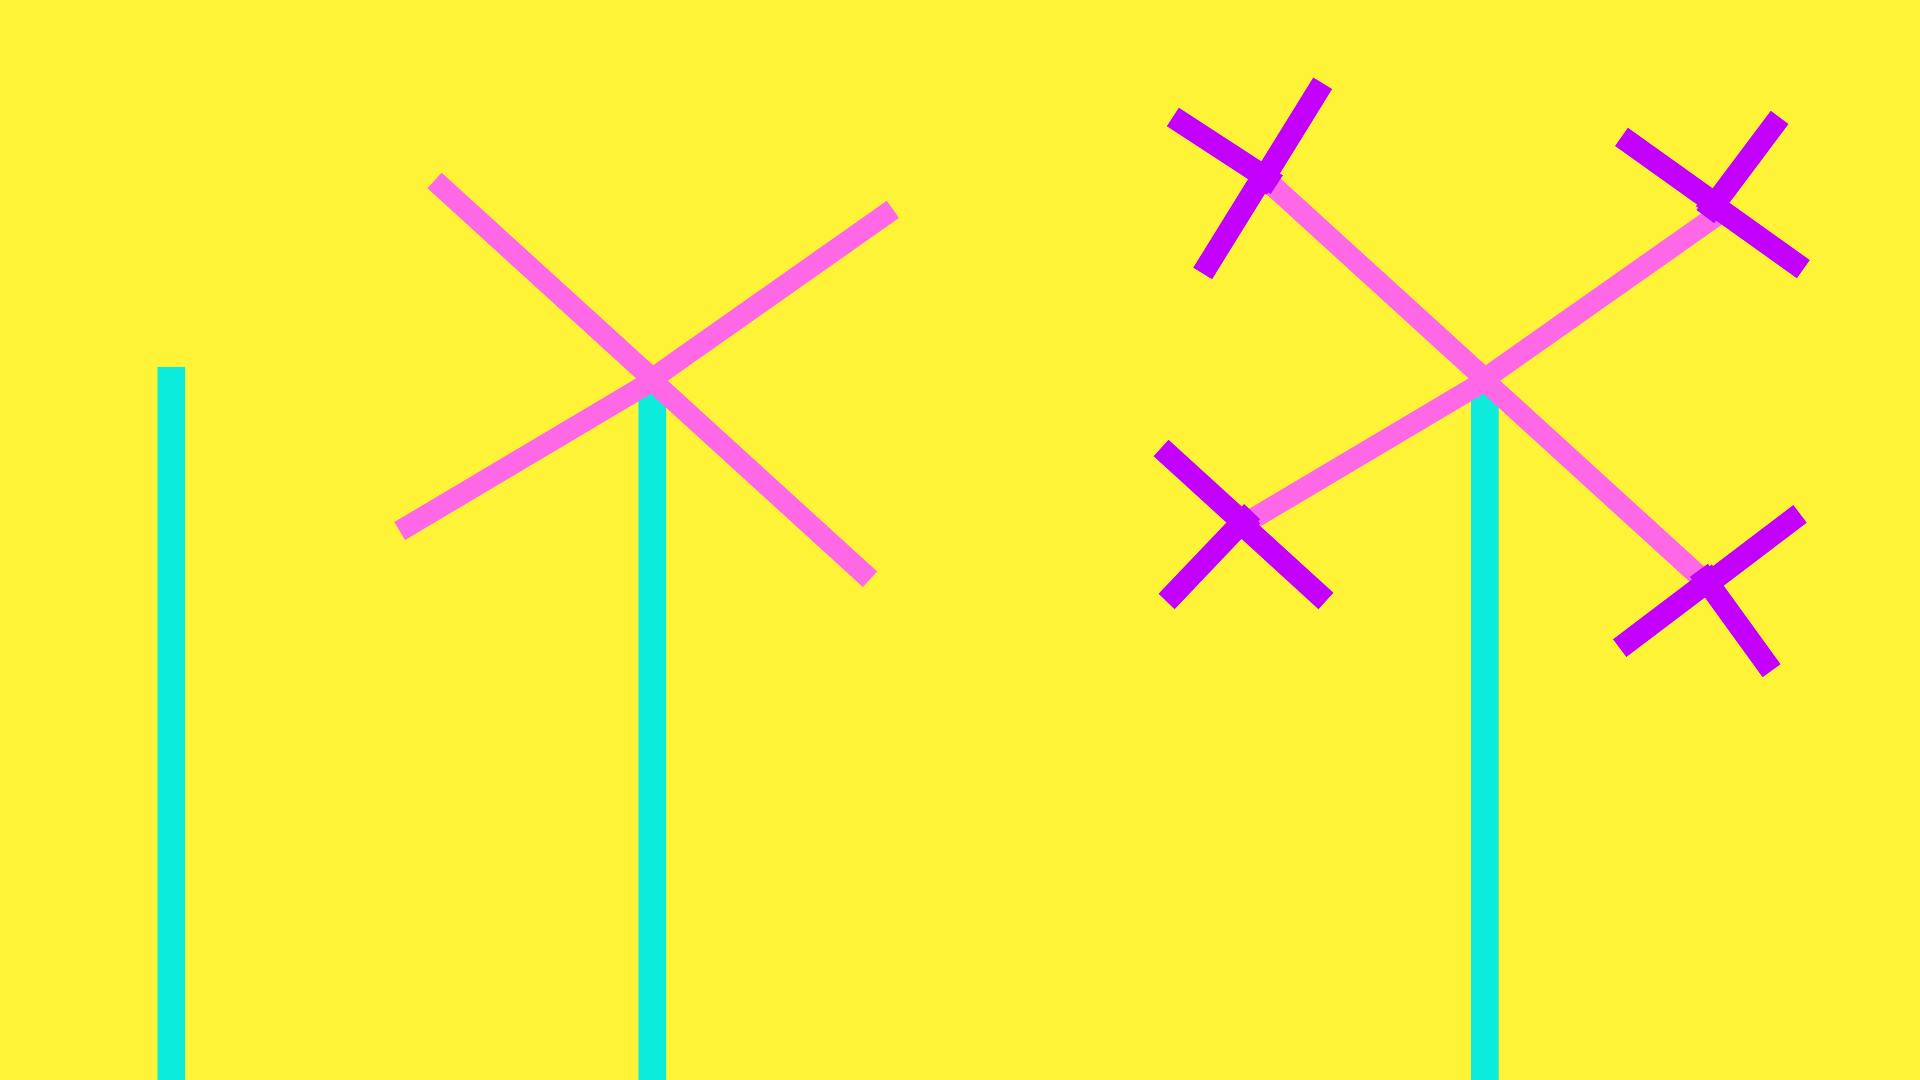
In the first image, I draw a teal-colored line from the bottom of the screen to approximately 2/3 of the way up. Then I create four sub-branches (the lavender lines). Each sub-branch is half as long as the previous branch and at roughly spread out every 90 degrees. Then I create three sub-branches (the amethyst lines). Each sub-branch is half as long as the previous branch and spread out roughly 90 degrees apart.
See what's happening there? My main logic of "draw n sub-branches half as long as the previous branch" is just repeated over and over until the sub-branch is too short. The drawing above is kinda ugly and looks like a kid's drawing of a tree, but that's mostly because there's not enough randomness. Real trees shoot out sub-branches at different angles and their lengths are all different. By using the JavaScript Math.random() function, I can make my tree look much more organic and real.
Ok, that's the overview. If you understand that, you should be able to understand the code just fine. I should start out though my admitting though, the code isn't 100% mine. I found this tutorial when searching around and really liked the results it gave. The code was functional and not object oriented, so I had to make a lot of changes, but the basics definitely come from there.
class Tree {
    constructor(
        startX,
        startY,
        len,
        angle,
        depth,
        branchWidth,
        color1,
        color2,
        leafColor,
        earth,
    ) {
        this.color1 = color1;
        this.color2 = color2;
        this.leafColor = leafColor;
        this.startX = startX;
        this.startY = startY;
        this.depth = depth;
        this.branchWidth = branchWidth;
        this.earth = earth;

        this.firstDraw = true;
        this.hasPropigated = false;

        this.instructions = [];
        this.leaves = [];
        this.leafFallIndex = -1;

        this.len = len;
        this.angle = angle;
        this.maxAngle = (2 * Math.PI) / 6;

        this.maxBranch = 2;
        this.subBranches = Math.random() * (this.maxBranch - 1) + 1;

        this.init(this.startX, this.startY, this.len, this.angle, this.depth, this.branchWidth);
    }

    /**
     * Randomly pick a leaf and let it fall until it hits the ground,
     * then tell Earth to plant a new tree at that location.
     */
    shake() {
        if (this.leafFallIndex == -1)
            this.leafFallIndex = Math.floor(Math.random() * this.leaves.length);
        if (this.leaves[this.leafFallIndex].y >= height) {
            if (!this.hasPropigated) {
                this.earth.plantNewTree(
                    this.leaves[this.leafFallIndex].x,
                    this.leaves[this.leafFallIndex].color,
                );
                this.hasPropigated = true;
            }
        } else {
            this.leaves[this.leafFallIndex].y++;
        }
    }

    /**
     * Draw the tree using stored instructions, followed by leaves.
     */
    draw() {
        // draw the tree
        for (let i = 0; i < this.instructions.length; i++) {
            ctx.beginPath();
            ctx.moveTo(this.instructions[i].startX, this.instructions[i].startY);
            const endX = this.instructions[i].endX;
            const endY = this.instructions[i].endY;
            ctx.lineCap = "round";
            ctx.lineWidth = this.instructions[i].lineWidth;
            ctx.lineTo(endX, endY);
            ctx.strokeStyle = this.instructions[i].color;
            ctx.stroke();
        }
        // draw the leaves
        for (let i = 0; i < this.leaves.length; i++) {
            this.leaves[i].draw();
        }
    }

    /**
     * Recursive function used to define the tree. As this tree is constantly
     * redrawn in an animation loop, we save processing power by only
     * computing the design once, then we redraw it from the saved instructions.
     */
    init(startX, startY, length, angle, depth, branchWidth) {
        let newLength;
        let newAngle;
        let newDepth;
        let maxAngle = (2 * Math.PI) / 6;

        let endX = startX + length * Math.cos(angle);
        let endY = startY + length * Math.sin(angle);

        let strokeColor;
        if (depth <= 2) {
            strokeColor = this.color2;
        } else {
            strokeColor = this.color1;
        }

        this.instructions.push({
            startX: startX,
            startY: startY,
            endX: endX,
            endY: endY,
            branchWidth: branchWidth,
            color: strokeColor,
        });
        newDepth = depth - 1;

        if (!newDepth) {
            // we're at the end of a branch, maybe add a leaf
            if (Math.random() >= 0.95) {
                this.leaves.push(new Leaf(startX, startY, this.leafColor));
            }
            // that's all she wrote, exit so we don't infinite loop
            return;
        }
        branchWidth *= 0.7;

        // call init over and over using each sub-branch
        for (var i = 0; i < this.subBranches; i++) {
            newAngle = angle + Math.random() * maxAngle - maxAngle * 0.5;
            newLength = length * (0.7 + Math.random() * 0.3);
            this.init(endX, endY, newLength, newAngle, newDepth, branchWidth);
        }
    }
}
One important thing to grok here is that I don't technically use recursion to draw the tree. I use recursion to create a set of instructions that can be repeated to draw and re-draw the same tree. Since this tree is going to be drawn and re-drawn 60x a second as part of the animation loop, I need a fixed set of instructions to re-create it. Since I'm using lots of randomness when creating the tree, I can't depend on being able to use the same recursive calls to re-create the same image.
The constructor is passed start x and y coordinates, two colors for the lines and one color for the leaves. Additionally it gets a reference to the Earth object (so we can callback and tell it to grow a new tree) and we setup a few other variable to track the leaves and their movement. Finally the recursive init() function is called, each successive call adds a new instruction to the array of instructions (this.instructions) and also populates the array of Leafs (this.leaves). When a line is determined to be too short, we add a Leaf to its end (in my case I'm only doing it 5% of the time to keep things from looking messy), and then we exit the recursion.
With the instruction array full, we're able to draw and re-draw the tree as needed. The draw() function iterates over the array, using the embedded instructions to draw successive lines. Then the draw() function iterates over the array of Leaf objects, telling each to draw itself.
Finally the shake() function randomly picks one Leaf object and increases its y value until it reaches the bottom of the frame. With the Leaf sitting on the ground, Tree calls back to Earth telling it to grow a new Tree at that location.
Leaf Class
One more class to go, this one is super-easy.
class Leaf {
    constructor(x, y, color) {
        this.x = x;
        this.y = y;
        this.color = color;
    }

    /**
     * Draw the leaf at current coordinates.
     */
    draw() {
        ctx.beginPath();
        ctx.strokeColor = bgColor;
        ctx.fillStyle = this.color;
        ctx.arc(this.x, this.y, 5, 0, 2 * Math.PI);
        ctx.stroke();
        ctx.fill();
    }
}
Each Leaf is created with x and y coordinates and a color. It exposes a draw() method the parent Tree object can call to ask that Leaf to draw itself.
Finally at the very bottom of the code, I create a new Earth object and setup my animation loop.
const earth = new Earth();
const drawAll = () => {
    // clear the background
    ctx.fillStyle = bgColor;
    ctx.fillRect(0, 0, ctx.canvas.width, ctx.canvas.height);
    earth.draw();
    // requestAnimationFrame causes the drawAll method to
    // be called over and over, roughly 60x a sec
    requestAnimationFrame(drawAll);
};
Ok, all of that code is over on GitHub and also pasted below to make it easy for y'all.
<!DOCTYPE html>
<html lang="en">
    <head>
        <meta charset="UTF-8" />
        <title>Recursive Tree</title>
    </head>
    <body>
        <canvas id="canvas" width="500" height="500"></canvas>
        <script>
            const canvas = document.getElementById("canvas");
            const ctx = canvas.getContext("2d");

            const bgColor = "#FFF338";
            const colors = ["#0CECDD", "#FF67E7", "#C400FF"];
            const width = canvas.width;
            const height = canvas.height;

            class Leaf {
                constructor(x, y, color) {
                    this.x = x;
                    this.y = y;
                    this.color = color;
                }

                /**
                 * Draw the leaf at current coordinates.
                 */
                draw() {
                    ctx.beginPath();
                    ctx.strokeColor = bgColor;
                    ctx.fillStyle = this.color;
                    ctx.arc(this.x, this.y, 5, 0, 2 * Math.PI);
                    ctx.stroke();
                    ctx.fill();
                }
            }

            class Tree {
                constructor(
                    startX,
                    startY,
                    len,
                    angle,
                    depth,
                    branchWidth,
                    color1,
                    color2,
                    leafColor,
                    earth,
                ) {
                    this.color1 = color1;
                    this.color2 = color2;
                    this.leafColor = leafColor;
                    this.startX = startX;
                    this.startY = startY;
                    this.depth = depth;
                    this.branchWidth = branchWidth;
                    this.earth = earth;

                    this.firstDraw = true;
                    this.hasPropigated = false;

                    this.instructions = [];
                    this.leaves = [];
                    this.leafFallIndex = -1;

                    this.len = len;
                    this.angle = angle;
                    this.maxAngle = (2 * Math.PI) / 6;

                    this.maxBranch = 2;
                    this.subBranches = Math.random() * (this.maxBranch - 1) + 1;

                    this.init(this.startX, this.startY, this.len, this.angle, this.depth, this.branchWidth);
                }

                /**
                 * Randomly pick a leaf and let it fall until it hits the ground,
                 * then tell Earth to plant a new tree at that location.
                 */
                shake() {
                    if (this.leafFallIndex == -1)
                        this.leafFallIndex = Math.floor(Math.random() * this.leaves.length);
                    if (this.leaves[this.leafFallIndex].y >= height) {
                        if (!this.hasPropigated) {
                            this.earth.plantNewTree(
                                this.leaves[this.leafFallIndex].x,
                                this.leaves[this.leafFallIndex].color,
                            );
                            this.hasPropigated = true;
                        }
                    } else {
                        this.leaves[this.leafFallIndex].y++;
                    }
                }

                /**
                 * Draw the tree using stored instructions, followed by leaves.
                 */
                draw() {
                    // draw the tree
                    for (let i = 0; i < this.instructions.length; i++) {
                        ctx.beginPath();
                        ctx.moveTo(this.instructions[i].startX, this.instructions[i].startY);
                        const endX = this.instructions[i].endX;
                        const endY = this.instructions[i].endY;
                        ctx.lineCap = "round";
                        ctx.lineWidth = this.instructions[i].lineWidth;
                        ctx.lineTo(endX, endY);
                        ctx.strokeStyle = this.instructions[i].color;
                        ctx.stroke();
                    }
                    // draw the leaves
                    for (let i = 0; i < this.leaves.length; i++) {
                        this.leaves[i].draw();
                    }
                }

                /**
                 * Recursive function used to define the tree. As this tree is constantly
                 * redrawn in an animation loop, we save processing power by only
                 * computing the design once, then we redraw it from the saved instructions.
                 */
                init(startX, startY, length, angle, depth, branchWidth) {
                    let newLength;
                    let newAngle;
                    let newDepth;
                    let maxAngle = (2 * Math.PI) / 6;

                    let endX = startX + length * Math.cos(angle);
                    let endY = startY + length * Math.sin(angle);

                    let strokeColor;
                    if (depth <= 2) {
                        strokeColor = this.color2;
                    } else {
                        strokeColor = this.color1;
                    }

                    this.instructions.push({
                        startX: startX,
                        startY: startY,
                        endX: endX,
                        endY: endY,
                        branchWidth: branchWidth,
                        color: strokeColor,
                    });
                    newDepth = depth - 1;

                    if (!newDepth) {
                        // we're at the end of a branch, maybe add a leaf
                        if (Math.random() >= 0.95) {
                            this.leaves.push(new Leaf(startX, startY, this.leafColor));
                        }
                        // that's all she wrote, exit so we don't infinite loop
                        return;
                    }
                    branchWidth *= 0.7;

                    // call init over and over using each sub-branch
                    for (var i = 0; i < this.subBranches; i++) {
                        newAngle = angle + Math.random() * maxAngle - maxAngle * 0.5;
                        newLength = length * (0.7 + Math.random() * 0.3);
                        this.init(endX, endY, newLength, newAngle, newDepth, branchWidth);
                    }
                }
            }

            class Earth {
                constructor() {
                    this.trees = [];
                    this.maxTrees = 9;
                    this.trees.push(
                        new Tree(
                            width / 2,
                            height,
                            60,
                            -Math.PI / 2,
                            12,
                            15,
                            colors[0],
                            colors[1],
                            colors[2],
                            this,
                        ),
                    );
                }

                /**
                 * Creates a new tree at x, height
                 */
                plantNewTree(x, leafColor) {
                    // filter array so we only have 2 colors different from leaf color
                    const newColors = colors.filter((color) => color != leafColor);

                    // make adjustments in case the leaf fell off-screen
                    if (x <= 0) x = 10;
                    if (x >= width) x = width - 10;

                    // add a new Tree object to our array
                    this.trees.push(
                        new Tree(
                            x,
                            500,
                            60,
                            -Math.PI / 2,
                            12,
                            15,
                            leafColor,
                            newColors[0],
                            newColors[1],
                            this,
                        ),
                    );

                    // if the array has reached max capacity, delete the oldest tree
                    // Using a FIFO style list allows the forest to slowly grow.
                    // Right now I'm just removing it from the screen, thinking I might
                    // want to animate its disappearance, but let's keep it simple for the tutorial.
                    if (this.trees.length >= this.maxTrees) this.trees.shift();
                }

                /**
                 * Draws our whole "planet", each tree followed by its leaves.
                 */
                draw() {
                    for (let i = 0; i < this.trees.length; i++) {
                        // draw the tree
                        this.trees[i].draw();
                        // shake the tree.
                        // while we do call shake() over and over, each tree will only drop exactly one leaf.
                        this.trees[i].shake();
                    }
                }
            }

            const earth = new Earth();
            const drawAll = () => {
                // clear the background
                ctx.fillStyle = bgColor;
                ctx.fillRect(0, 0, ctx.canvas.width, ctx.canvas.height);
                earth.draw();
                // requestAnimationFrame causes the drawAll method to
                // be called over and over, roughly 60x a sec
                requestAnimationFrame(drawAll);
            };

            drawAll();
        </script>
    </body>
</html>
Blockchain Code.
Ok, now we have a really cool HTML animation all contained in one large file. You can open it in your browser and watch the leaves fall over and over. To turn it into an NFT, I'm going to need to
- Create an NFT Smart Contract to manage ownership.
- Upload the
index.htmlfile to Bundlr and embed that URL into the NFT metadata. - Upload the NFT metadata to Bundlr.
- Use that NFT metadata to mint the NFT.
The Smart Contract
The most popular language for coding smart contracts (blockchain apps) is called Solidity, if you're super new to coding, it might look a bit strange to you ... but if you have a coding background, it should be easy to understand the basics. I'm going to make use of existing open-source contracts provided by the OpenZeppelin foundation, which means we will write almost zero code ourselves.
OpenZeppelin provides this really handy wizard you can use to kickstart your contracts. Head on over to their wizard and start by clicking "ERC721" at the top, this is the standard for an NFT contract. Down in the "features" section, click "Mintable => Auto Increment Ids" and "URI Storage".
"Mintable => Auto Increment Ids" adds a function that can be called to mint a new NFT and URI Storage allows us to pass a bunch of metadata to the mint function specifying the location of the index.html file. Take the code generated, copy and paste it into a new file called NeonForest.sol. I'm not going to dig too deep into Solidity here, mostly I want to show how you can deploy an NFT without fully grokking the language. That said, when you're ready to go deep, set aside 32 hours and do this (amazing & free) class. And also make sure to join me over in the Telegram and Discord for the Alchemy Road to Web 3.
// SPDX-License-Identifier: MIT
pragma solidity ^0.8.4;

import "@openzeppelin/contracts/token/ERC721/ERC721.sol";
import "@openzeppelin/contracts/token/ERC721/extensions/ERC721URIStorage.sol";
import "@openzeppelin/contracts/access/Ownable.sol";
import "@openzeppelin/contracts/utils/Counters.sol";

contract NeonForest is ERC721, ERC721URIStorage, Ownable {
    using Counters for Counters.Counter;

    Counters.Counter private _tokenIdCounter;

    constructor() ERC721("Neon Forest", "NEON") {}

    function safeMint(address to, string memory uri) public onlyOwner {
        uint256 tokenId = _tokenIdCounter.current();
        _tokenIdCounter.increment();
        _safeMint(to, tokenId);
        _setTokenURI(tokenId, uri);
    }

    // The following functions are overrides required by Solidity.

    function _burn(uint256 tokenId)
        internal
        override(ERC721, ERC721URIStorage)
    {
        super._burn(tokenId);
    }

    function tokenURI(uint256 tokenId)
        public
        view
        override(ERC721, ERC721URIStorage)
        returns (string memory)
    {
        return super.tokenURI(tokenId);
    }
}
Smart Contracts are blockchain applications whose bytecode sits fully on a blockchain (Ethereum, Polygon, Fantom, etc ..). Once on the blockchain, the code can be called by anyone anywhere. This is how ownership is managed with NFTs. My Smart Contract maintains a ledger of who owns what and anyone can query the contract to ensure ownership. If you come from a web2 background, this is analogous to a database backend. The main difference here is the blockchain code can never be changed or stopped. Once it's deployed, it's always there even if I decide to stop coding and go live on a farm. The Smart Contract is immutable, once deployed it can not be changed. Ever.
To deploy this contract, I'm going to use Remix, a really simple website created to help people begin blockchain coding without having to install lots of things locally.
Start by heading over to Remix and creating a new file in the contracts folder titled "NeonForest.sol", then copy and paste the code from the OpenZeppelin Wizard into the file.
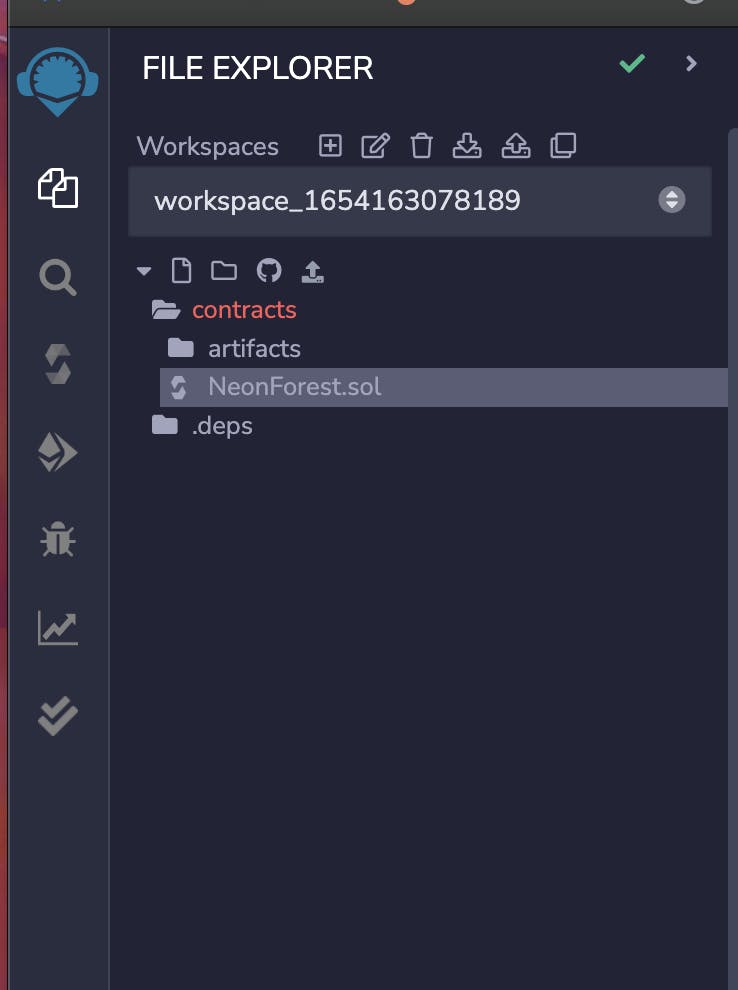
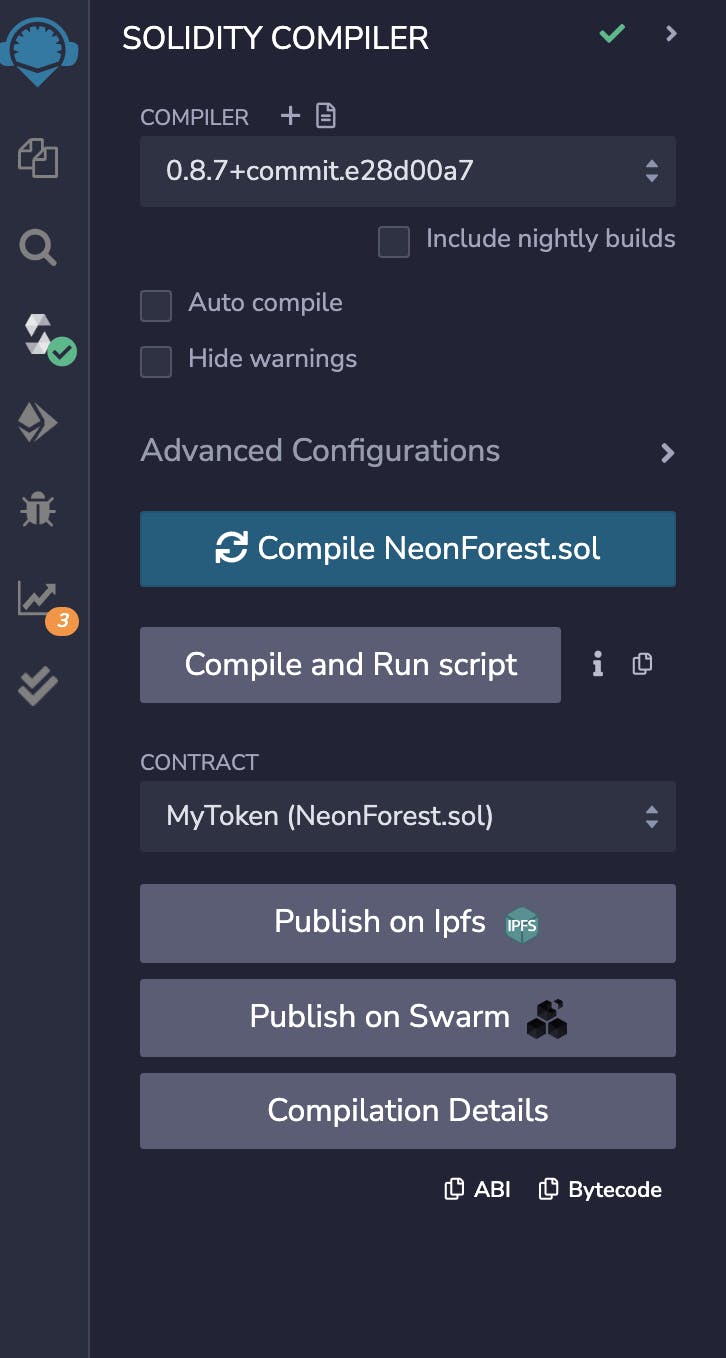
Two stops down on the UI is the "Compile" tab, click that and click "Compile NeonForest.sol".
One more stop down on the UI is the "Deploy" tab, click that, then under "ENVIRONMENT" change the dropdown to "Injected Provider - MetaMask" and click the orange "Deploy" button. This part might be confusing if you're new to web3 development, as you'll need to pay for the transaction using the native coin of the blockchain. Meaning if you want to deploy on Ethereum, you'll need some ETH. If you want to deploy on Polygon, you'll need some MATIC. MetaMask is a browser extension that allows your browser to securely communicate with the blockchain. If you've never used it before, try using this video to set things up.
While blockchains do charge a fee for each transaction, they also provide testnets where you can use free testnet funds during development. Since I'm just experimenting here, I'll use the Polygon Mumbai testnet andfund my wallet with some free MUMBAI MATIC.
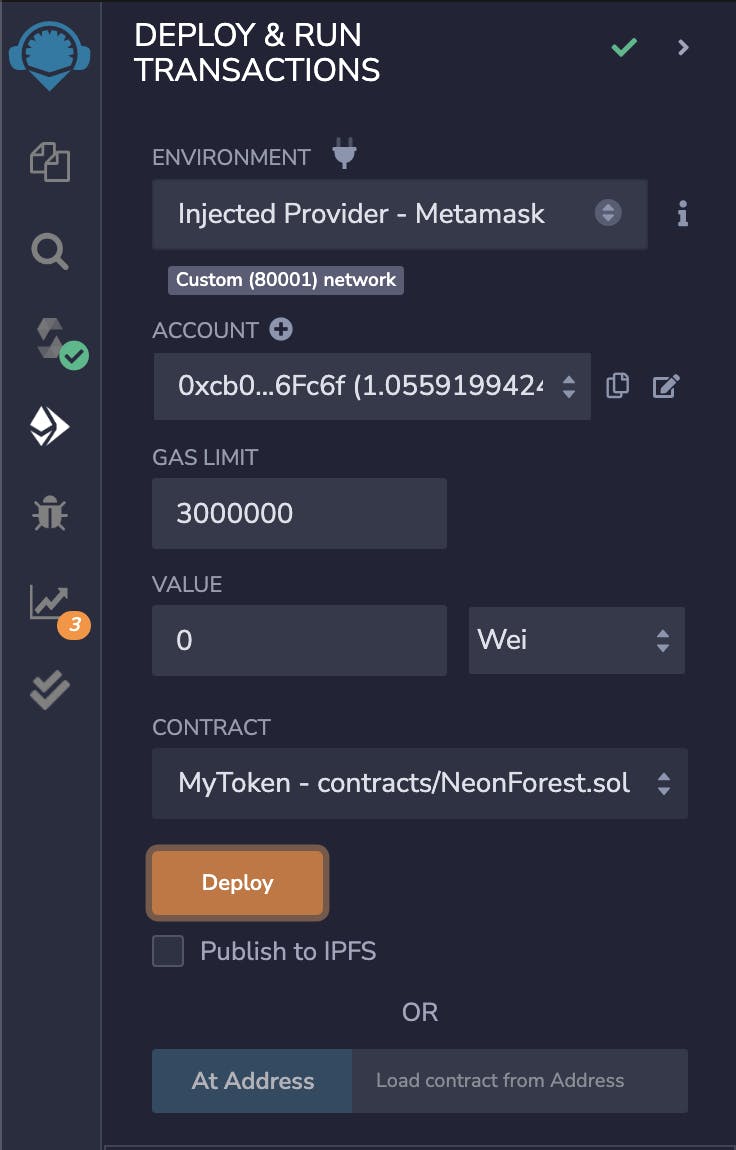
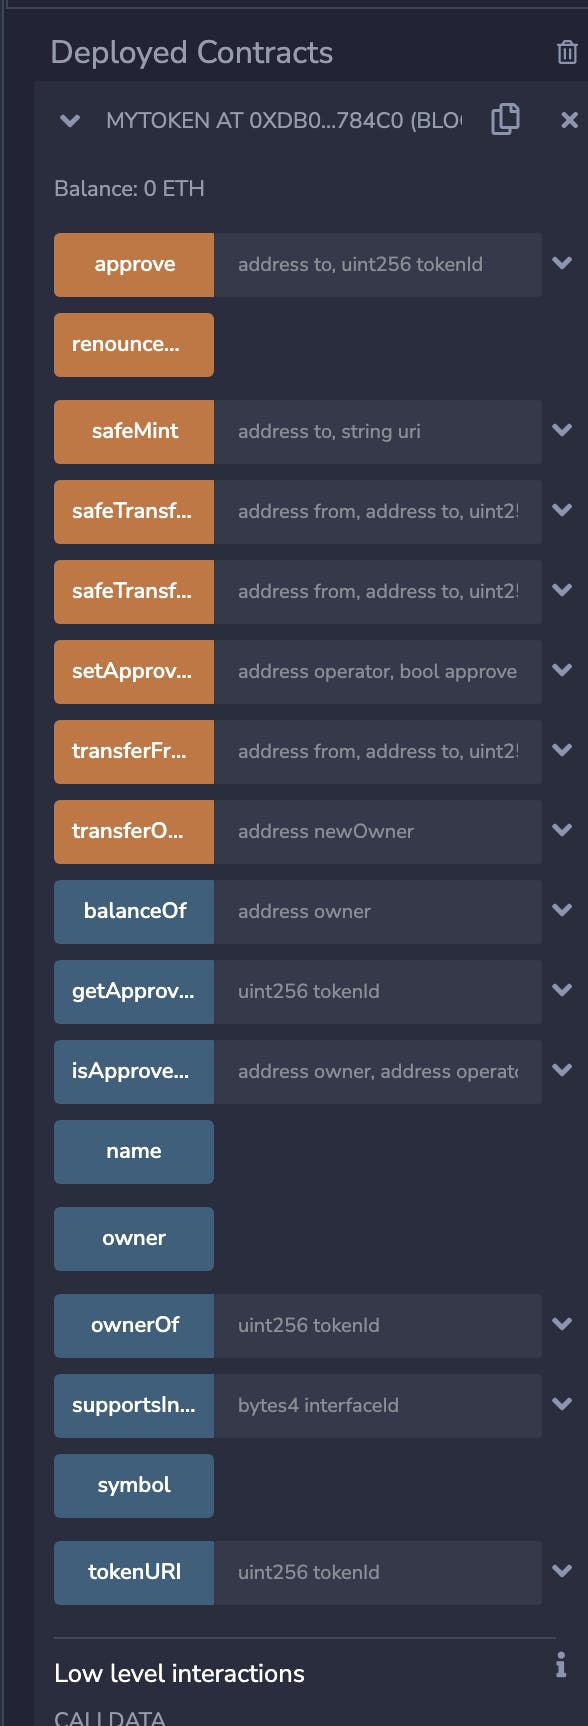
Clicking the orange "Compile" button will cause MetaMask to popup asking us to pay a small fee to pay for the contract deployment. Once deployed, it will appear at the bottom of the screen in the "Deployed Contracts" section.
NFT Metadata
Ok, with the Smart Contract deployed and ready to go, it's time to start preparing the NFT metadata. This is also where we get to the challenge part of the tutorial ... you'll need to upload the index.html page from above to Bundlr / Arweave, but I'm not going to tell you how to do it. You'll have to read my previous tutorial and apply that to uploading the file. If you get stuck, leave a comment and I'll help ... but it should be pretty easy.
Once uploaded to Bundlr, you'll end up with an URL pointing to index.html that looks something like this https://arweave.net/ya16e5Ur1enjUv7kdY8sMlBEAn_7QM4cRMo0HqRmq_U. In addition to uploading a link to the animation, you'll need to upload a link to a static thumbnail. Then both of these values are embedded in a metadata.json file that looks something like this.
{
    "description": "If only to see the tree for the forest",
    "external_url": "https://luke.gallery",
    "image": "https://arweave.net/7u5wKj0j_WlzmhO2knmoQIlT9c0Ggai1z_lDfuPbA6k",
    "name": "Luke Cassady-Dorion",
    "animation_url": "https://arweave.net/ya16e5Ur1enjUv7kdY8sMlBEAn_7QM4cRMo0HqRmq_U"
}
Finally take that metadata file upload it to Bundlr, and then it's mint time!
Back on Remix, over under "Deployed Contracts" you'll see a list of all functions exposed by the Smart Contract. You can interact directly with the contract here, don't need to build any sort of special UI.
Expand the safeMint() function and in the to section, put the recipient address of the wallet to receive the NFT. If you want to mint to yourself, use your own wallet address. In the uri section, include Bundlr / Arweave link to the NFT metadata. Note, don't use the link to the index.html file, you need to be one level higher here and provide a link to the metadata.
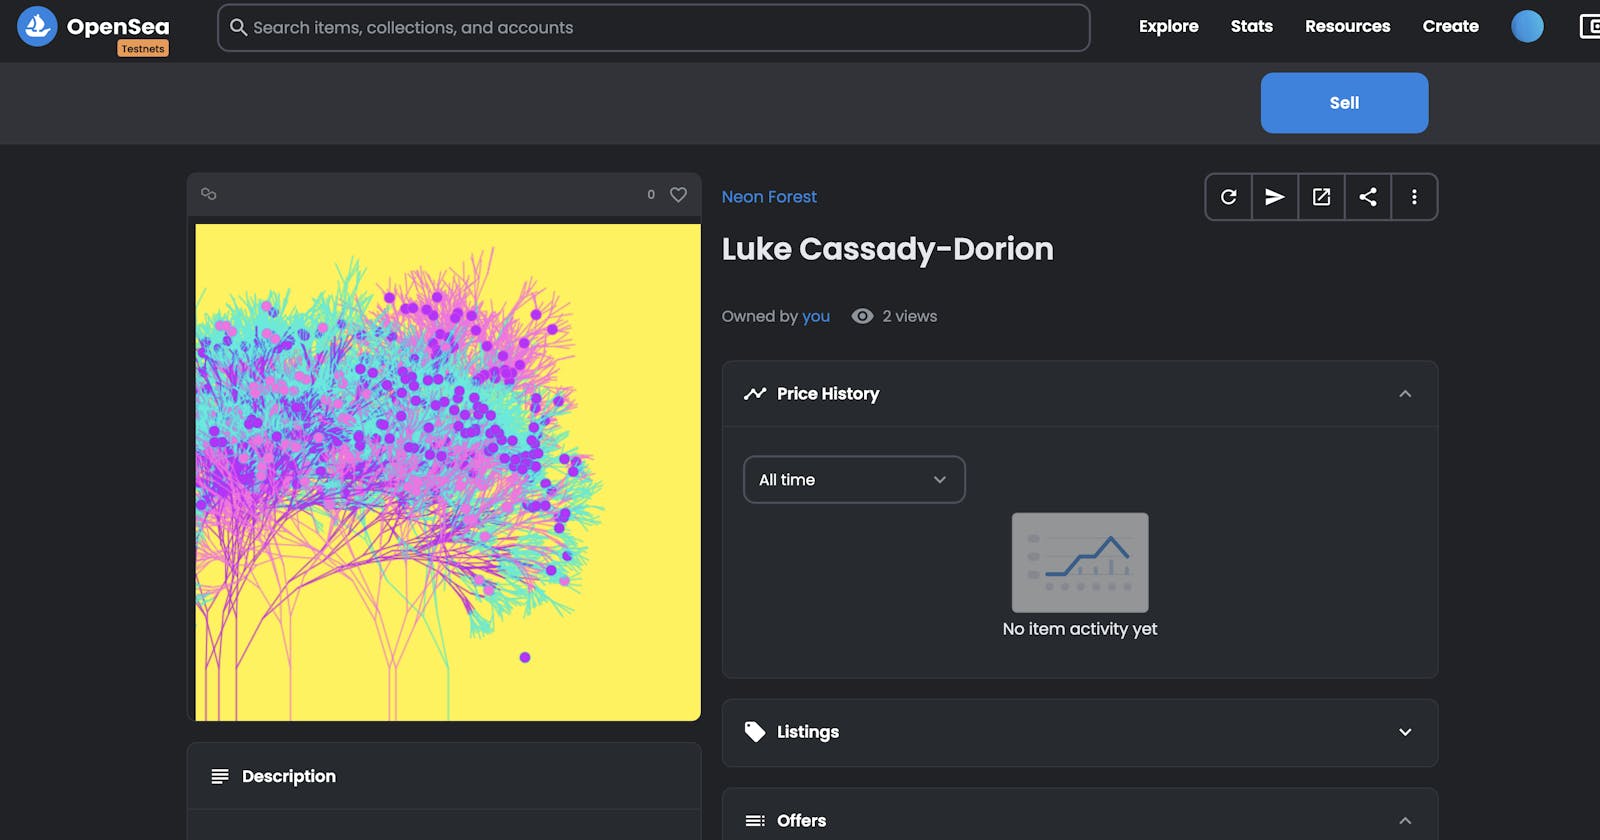
Click the orange "transact" button and your NFT will be minted. Once minted, you can view your NFT over on OpenSea. Assuming you used testnet MATIC to mint, your NFT will be visible at https://testnets.opensea.io/account. (It might take a few hours to appear, although it usually shows up faster).
What's Next
I'm really digging how this all came out, but as always I'm ending up with lots more rabbit holes I want to jump down. Next up, I'm going to look at using 3rd party libraries and bundling it all together ... hmm, I maybe I should try turning one of my songs into a music NFT too?
